Introduction
Ageniqx is an AI agent platform that lets you build, deploy, and manage intelligent automations across your business — no coding required. You design agents using a visual canvas, connect them to your existing tools, and activate them across channels like WhatsApp, email, and web chat.
Agents can answer customer questions, route requests, send emails, update CRM records, analyze documents, and much more — running around the clock without manual intervention.
Core concepts
| Concept | What it is |
|---|---|
| Agent | An AI worker with a defined role, instructions, and access to tools. Lives inside a Workspace. |
| Agentic App | A multi-step workflow that orchestrates one or more agents, triggers, and actions in a visual canvas. |
| Workspace | Your organisation's shared environment — contains agents, apps, integrations, and team members. |
| Channel | The surface where your agent interacts with users: WhatsApp, Email, Web Chat, or API. |
| Tool | A capability the agent can invoke — e.g. Send Email, Search Web, Update CRM, Generate PDF. |
| Execution | A single run of an agent or agentic app, triggered by an event, schedule, or user message. |
Getting Started
Getting up and running with Ageniqx takes under five minutes. Here's the path from zero to your first active agent:
1. Create your account
Go to app.ageniqx.com/register and sign up with your email. After email verification you'll be prompted to create your first Workspace.
2. Set up your Workspace
A Workspace is your organisation's container. Give it a name (e.g. "Bella Vita Spa"), choose your primary language, and optionally fill in your Business Profile — this gives your agents context about your company, services, and tone of voice.
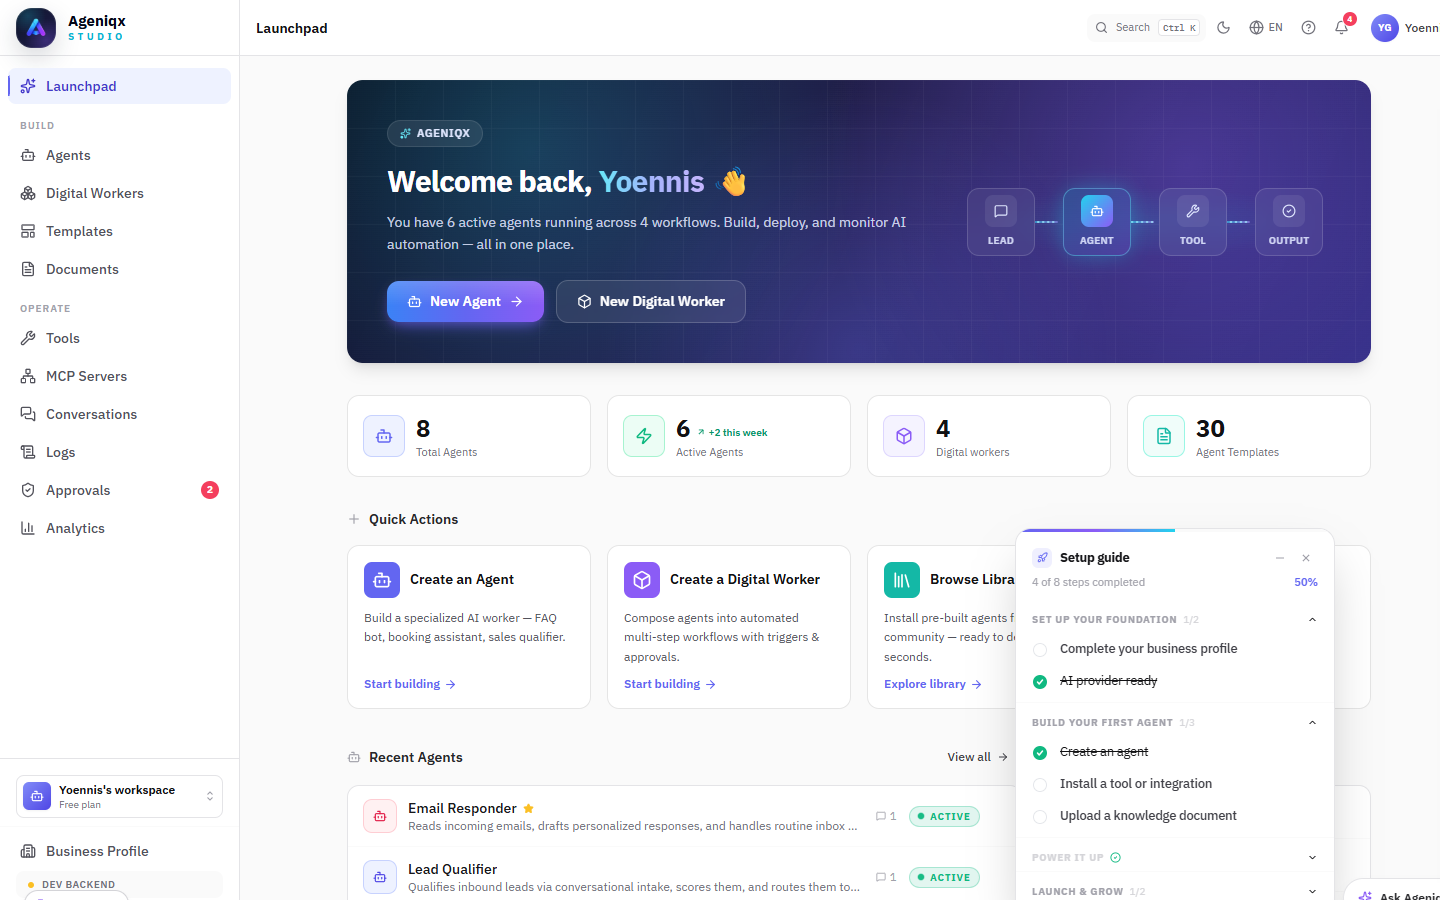
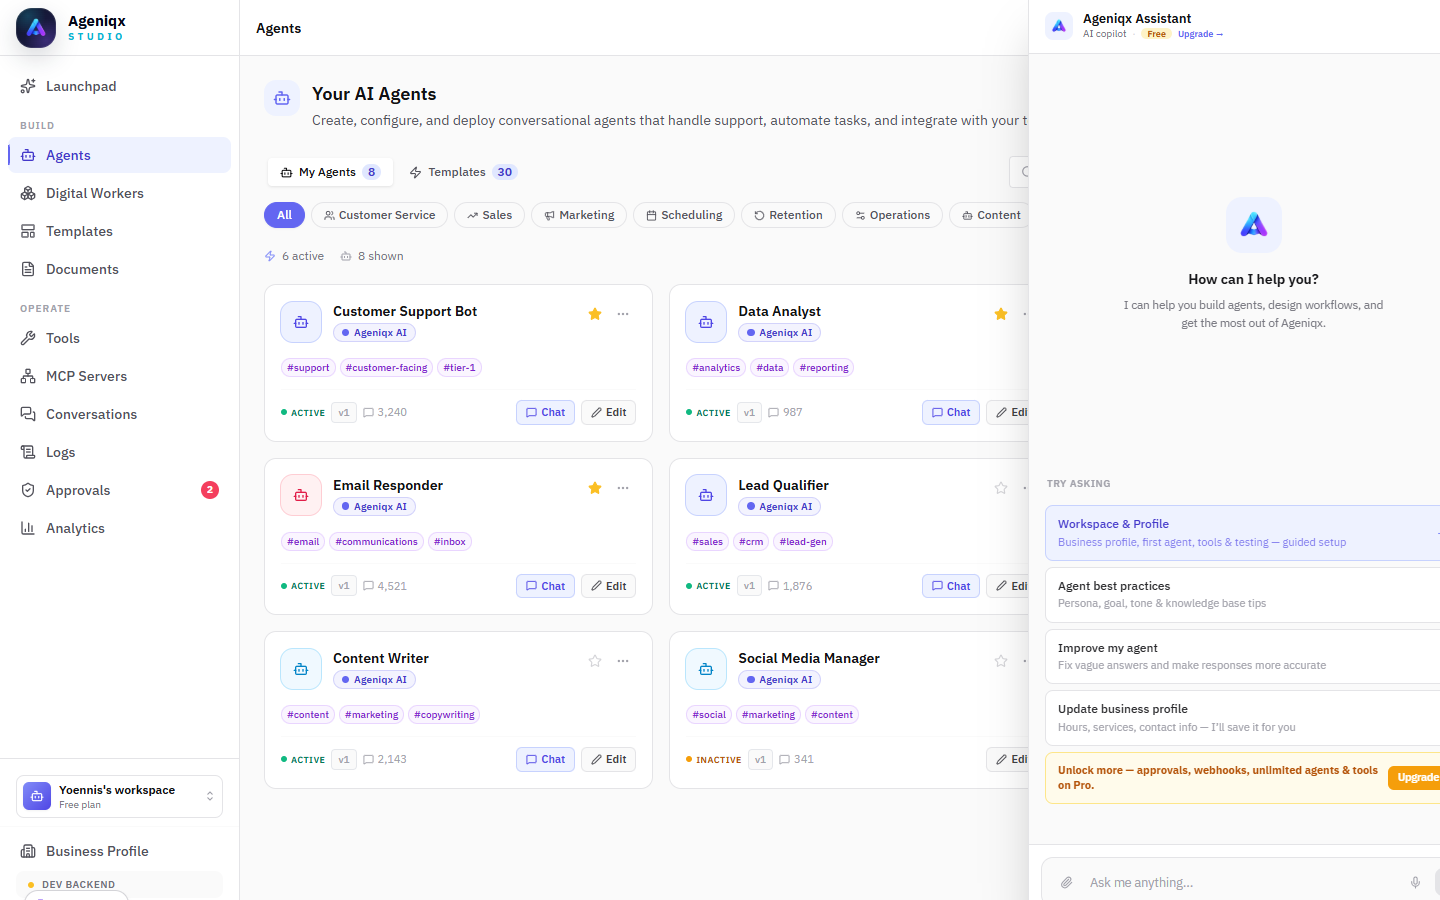
The Ageniqx dashboard — your home base for managing agents, apps, and workspace settings.
3. Connect an AI provider
Navigate to Settings → Environment and add at least one AI provider API key. Ageniqx supports OpenAI, Anthropic, and Google Gemini. You only need one to get started — we recommend GPT-4o Mini for most use cases (fast, affordable, accurate).
4. Create your first agent
Click New Agent from the dashboard. You can start from scratch or choose from the Agent Template Gallery — pre-built agents for common scenarios like customer support, sales assistant, appointment booking, and more.
Setup Wizard
The first time you sign in, Ageniqx walks you through a 5-step guided wizard. It takes about 3 minutes and leaves you with a running agent ready to test. You can re-run it anytime from Settings → General.
Step 1 — Welcome
A quick overview of what you'll configure: Business info, AI provider, and your first agent template. Click Build my first agent to begin.
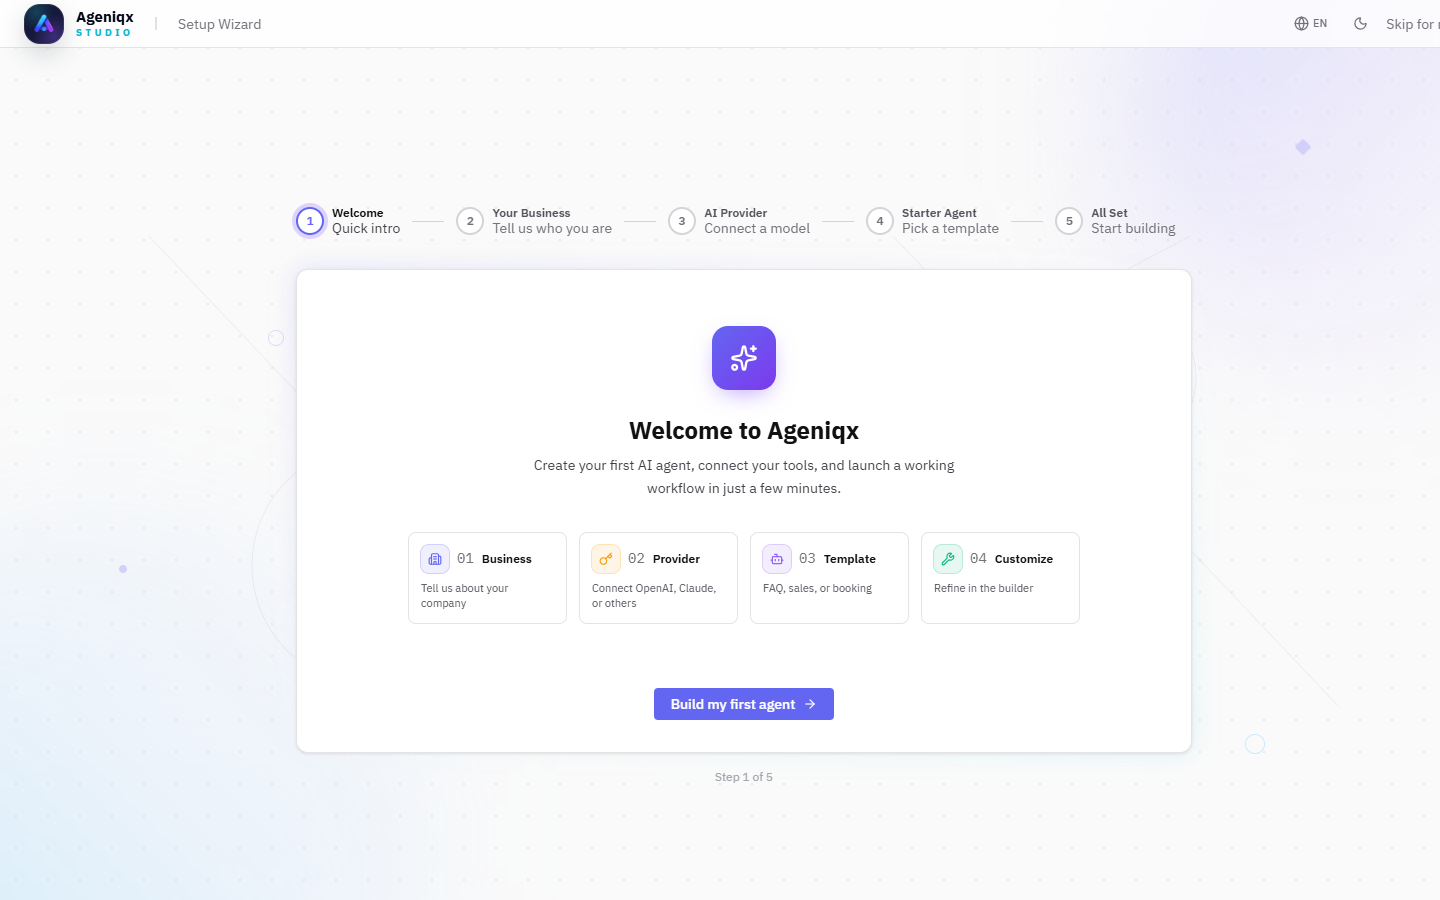
The Setup Wizard welcome screen with a 4-step overview.
Step 2 — Your Business
Tell Ageniqx about your company. This context is used to pre-fill your Business Profile and tune agent responses.
- Business name — the public name of your organisation.
- Industry — pick the closest match (Restaurant, Retail, Healthcare, Real Estate, Consulting, Education, Hospitality, Beauty / Wellness, or Other).
- Brief description — what you do and who you serve (optional but recommended).
- Country & City — used by agents for localised responses (optional).
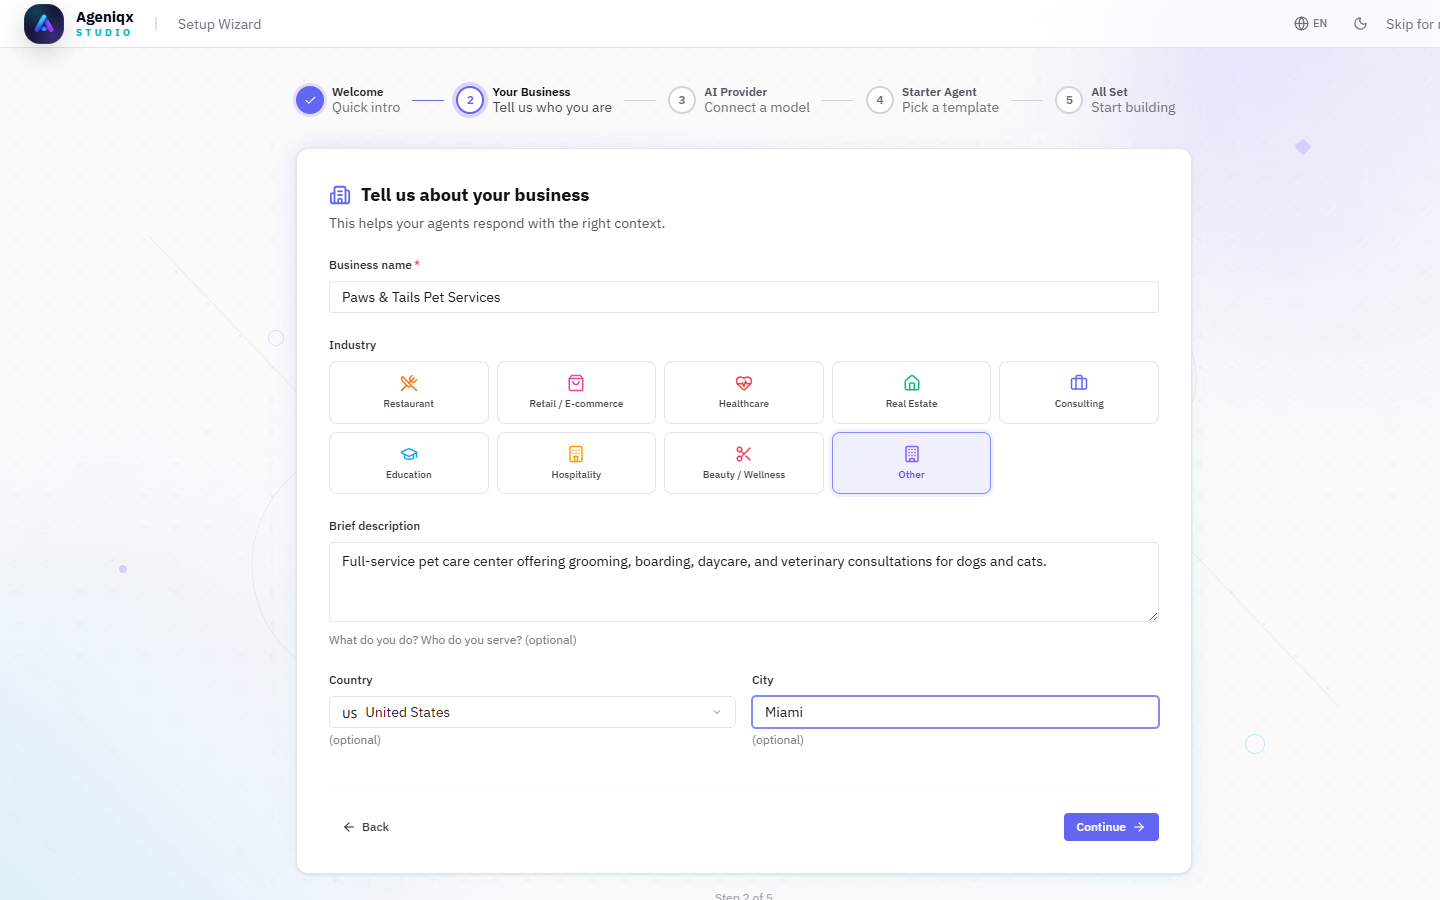
Business details form — name, industry, description, location.
Step 3 — AI Provider
AgeniqxAI is selected by default and requires no API key — it's included in all plans. If you have your own API keys, choose from OpenAI, Azure OpenAI, Anthropic, Google Gemini, DeepSeek, Perplexity, or xAI (Grok). You can always add or change providers later in Settings → Environment.
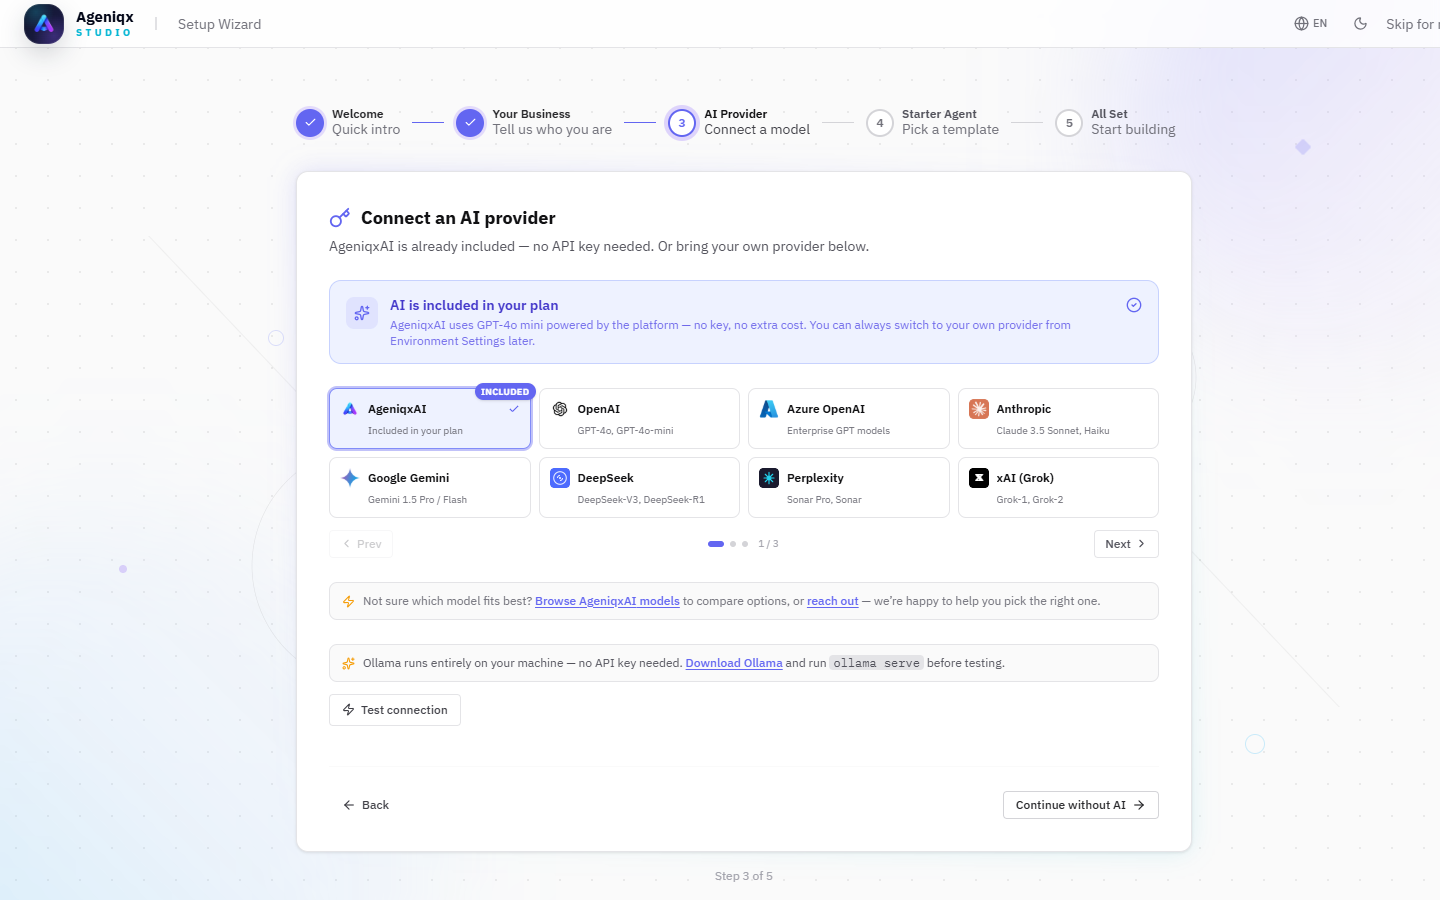
AI Provider step showing AgeniqxAI pre-selected with all supported providers.
Step 4 — Starter Agent
Choose a pre-built template to kick-start your first agent. The wizard recommends templates based on your industry. Three options are shown:
- Customer FAQ Agent — answers questions about hours, pricing, and policies.
- Lead Qualification Agent — captures prospect details and books follow-ups.
- Feedback Collector — gathers post-service reviews and complaints.
You can also skip this step and start from scratch in the Agent Builder.
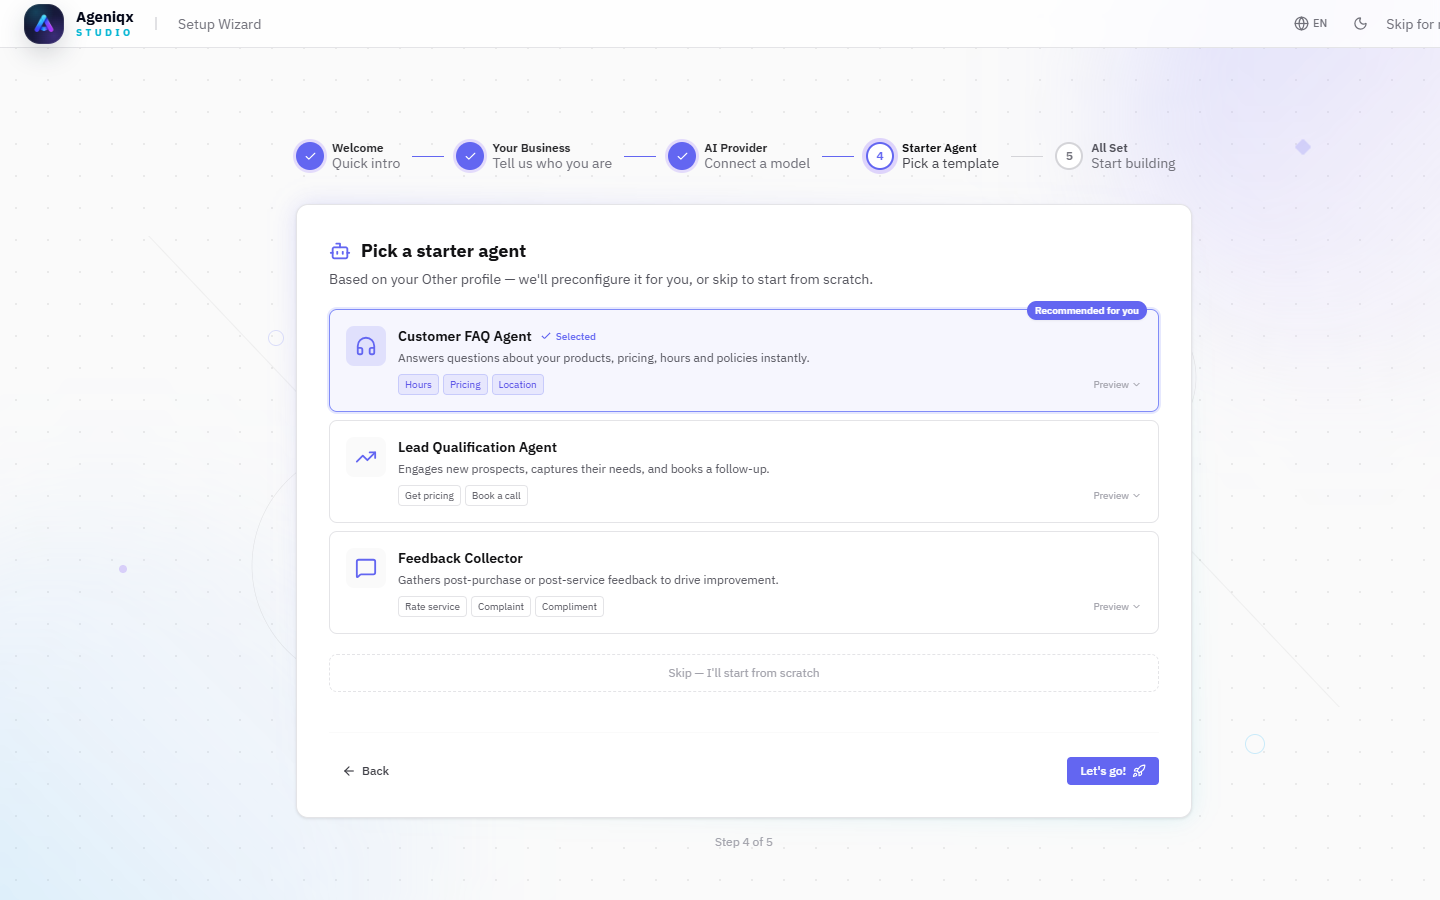
Template picker with industry-tailored recommendations. Customer FAQ Agent is pre-selected.
Step 5 — All Set
A summary of everything configured: your business name, AI provider, and the starter agent created as a draft. From here you can go directly to the Agent Builder to customise, view all your agents, or head to the Launchpad.
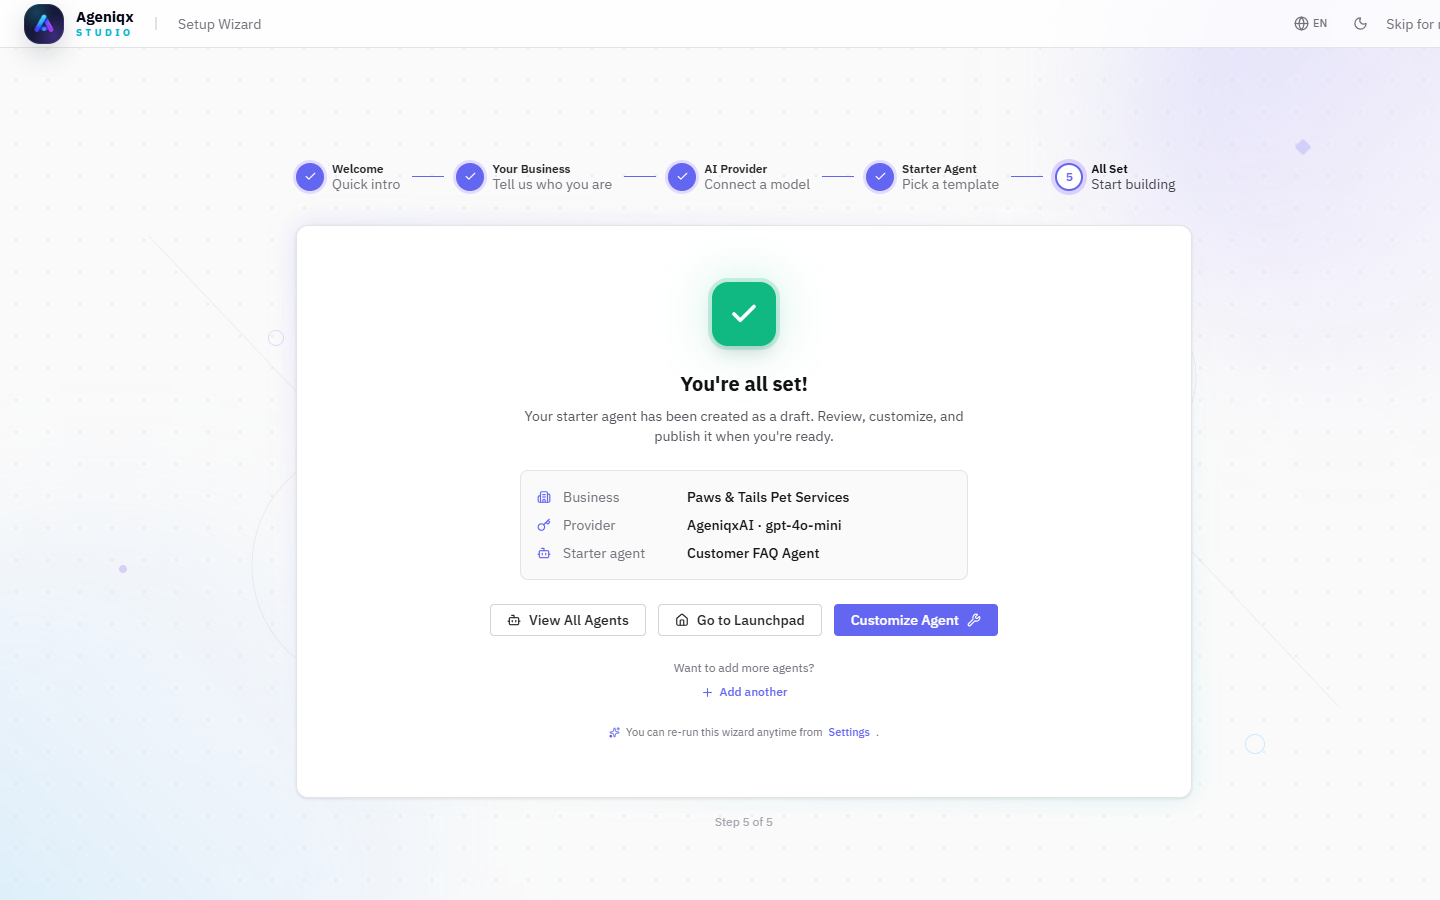
The "You're all set!" screen showing the configured business, provider, and starter agent.
Workspace Management
A Workspace is the shared container for your organisation's agents, apps, integrations, and team members. Everything you build lives inside a workspace, and all billing is tracked at the workspace level.
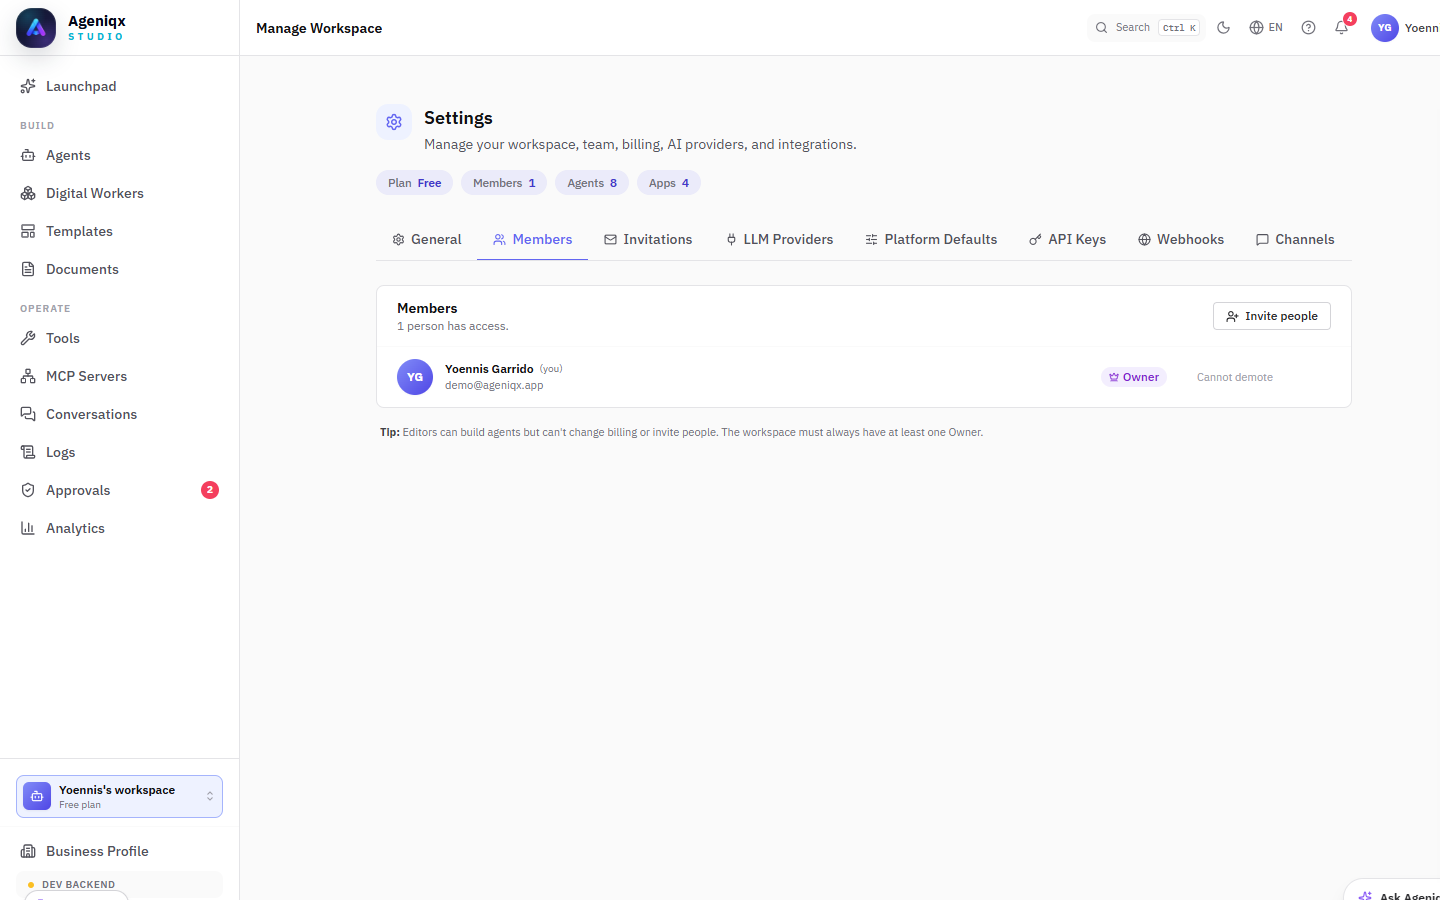
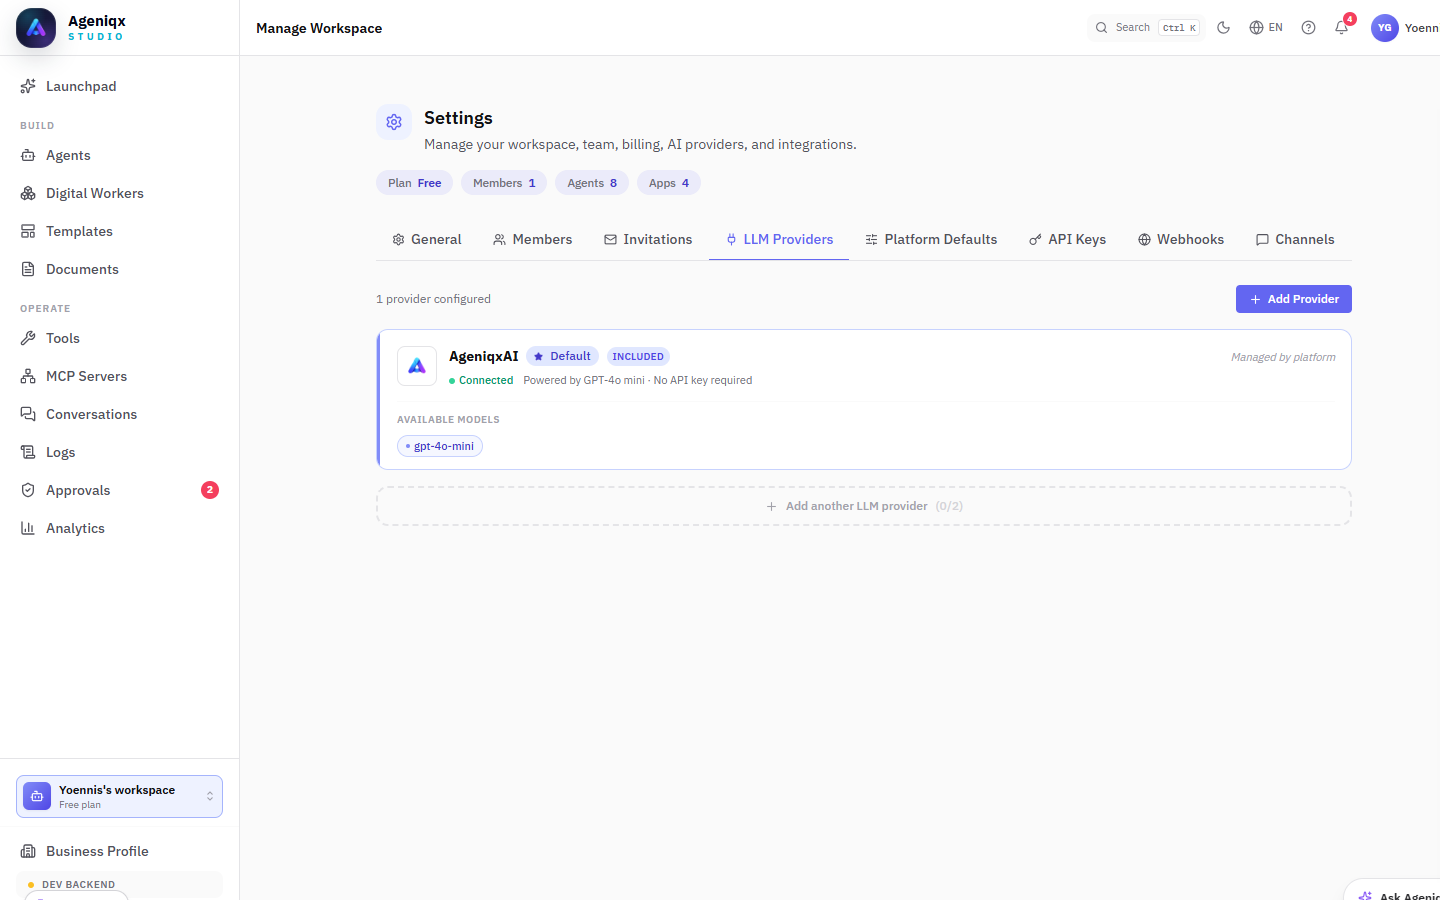
Workspace Settings — manage team members, invitations, API keys, channels, and AI providers from one place.
Settings tabs
| Tab | What you can do |
|---|---|
| General | Rename the workspace, change the icon, delete the workspace. |
| Members | View all members, change roles (Owner / Editor), remove members. |
| Invitations | Send email invitations and manage pending invites. |
| LLM Providers | Connect OpenAI, Anthropic, or Google API keys. Each workspace can have up to 2 additional providers on top of the built-in AgeniqxAI model. |
| Platform Defaults | Set the default AI model and language for all new agents in this workspace. |
| API Keys | Generate and revoke API keys for programmatic access. |
| Webhooks | Register outbound webhooks to notify your systems of agent events. |
| Channels | Connect communication channels (WhatsApp, Email, Chat Widget, etc.) and assign them to agents. |
Roles
There are two member roles in Ageniqx:
- Owner — full access: create agents, manage billing, invite/remove members, change settings. Every workspace must have at least one Owner.
- Editor — can build and publish agents and apps, but cannot change billing, invite members, or modify API keys.
Business Profile
The Business Profile is your company's shared context — a structured knowledge base that all your agents automatically receive at runtime. Instead of copy-pasting your business information into every agent's system prompt, you define it once here and it propagates everywhere.
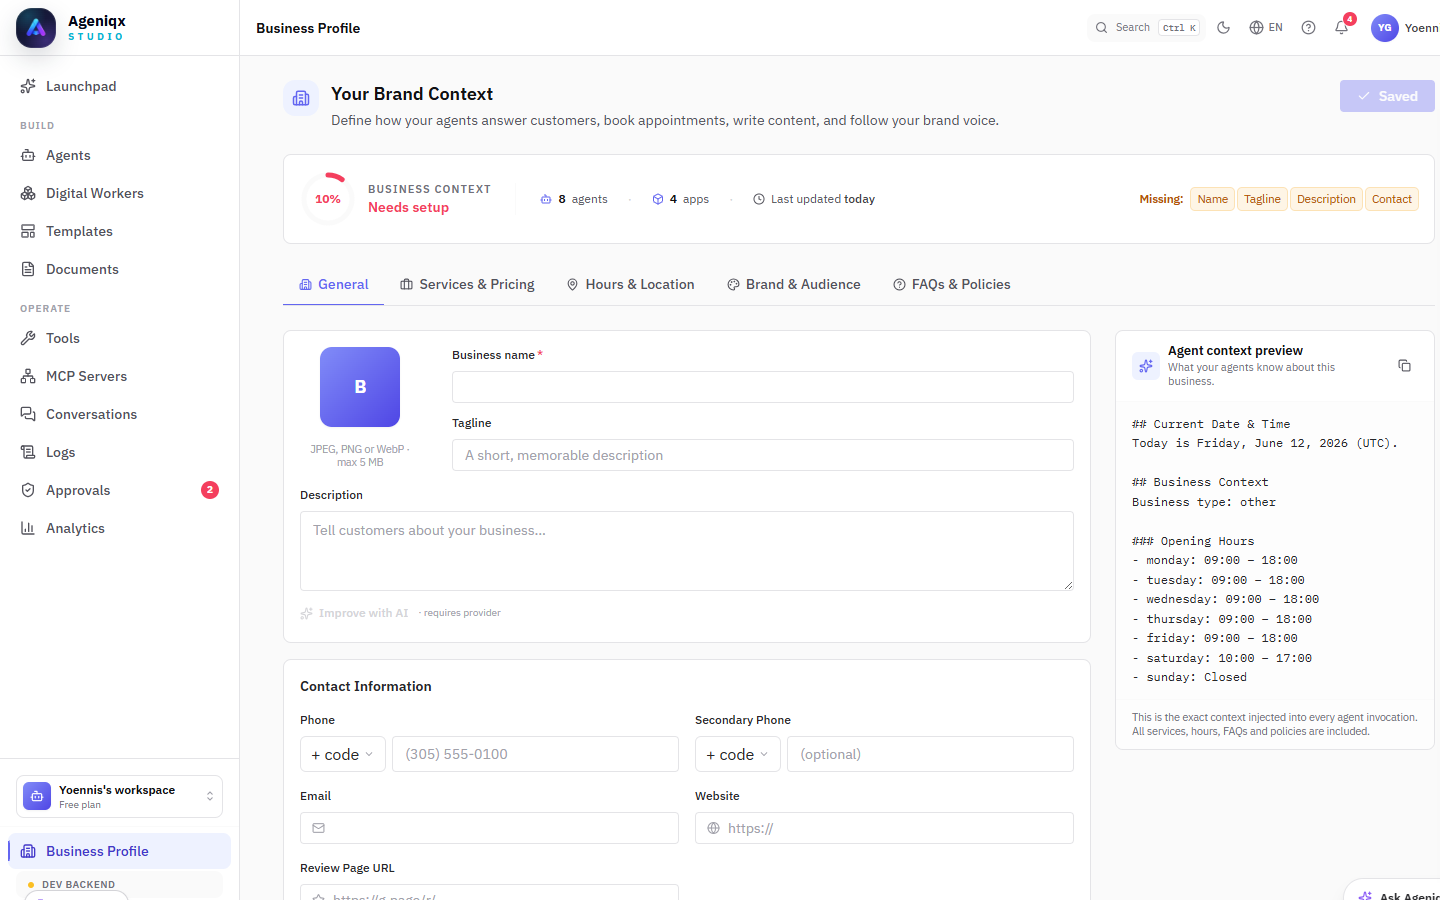
Business Profile — the single source of truth injected into every agent's context at runtime.
Profile sections
| Tab | What to fill in |
|---|---|
| General | Business name, tagline, description, logo, contact info (phone, email, website), and social media links. |
| Services & Pricing | Your products or services with names, descriptions, prices, and durations. |
| Hours & Location | Opening hours for each day of the week, physical address, and map link. |
| Brand & Audience | Tone of voice (formal, casual, friendly), target audience, and brand personality guidelines. |
| FAQs & Policies | Frequently asked questions, cancellation policy, return policy, and other policies your agents should know. |
Agent context preview
On the right side of the Business Profile page you'll find the Agent context preview — this shows the exact text that gets injected into every agent's system prompt. It updates live as you fill in the form, so you can see precisely what information your agents will have access to.
Your First Agent
When creating an agent you define four things: its identity, its instructions, its AI model, and its tools.
Agent identity
Give your agent a name (visible to end users), an optional avatar, and a description. For example: Name: Amaya — Description: Customer-facing support agent for Bella Vita Spa.
System instructions
This is the agent's core directive — written in plain language. Good instructions are specific and tell the agent exactly what it can and cannot do.
Example system prompt
You are Amaya, the virtual assistant for Bella Vita Spa. Your role is to answer questions about services, pricing, and availability. Always be warm and professional. If asked about medical advice, politely decline and refer to a doctor. Never disclose internal pricing beyond what's listed in your knowledge base.
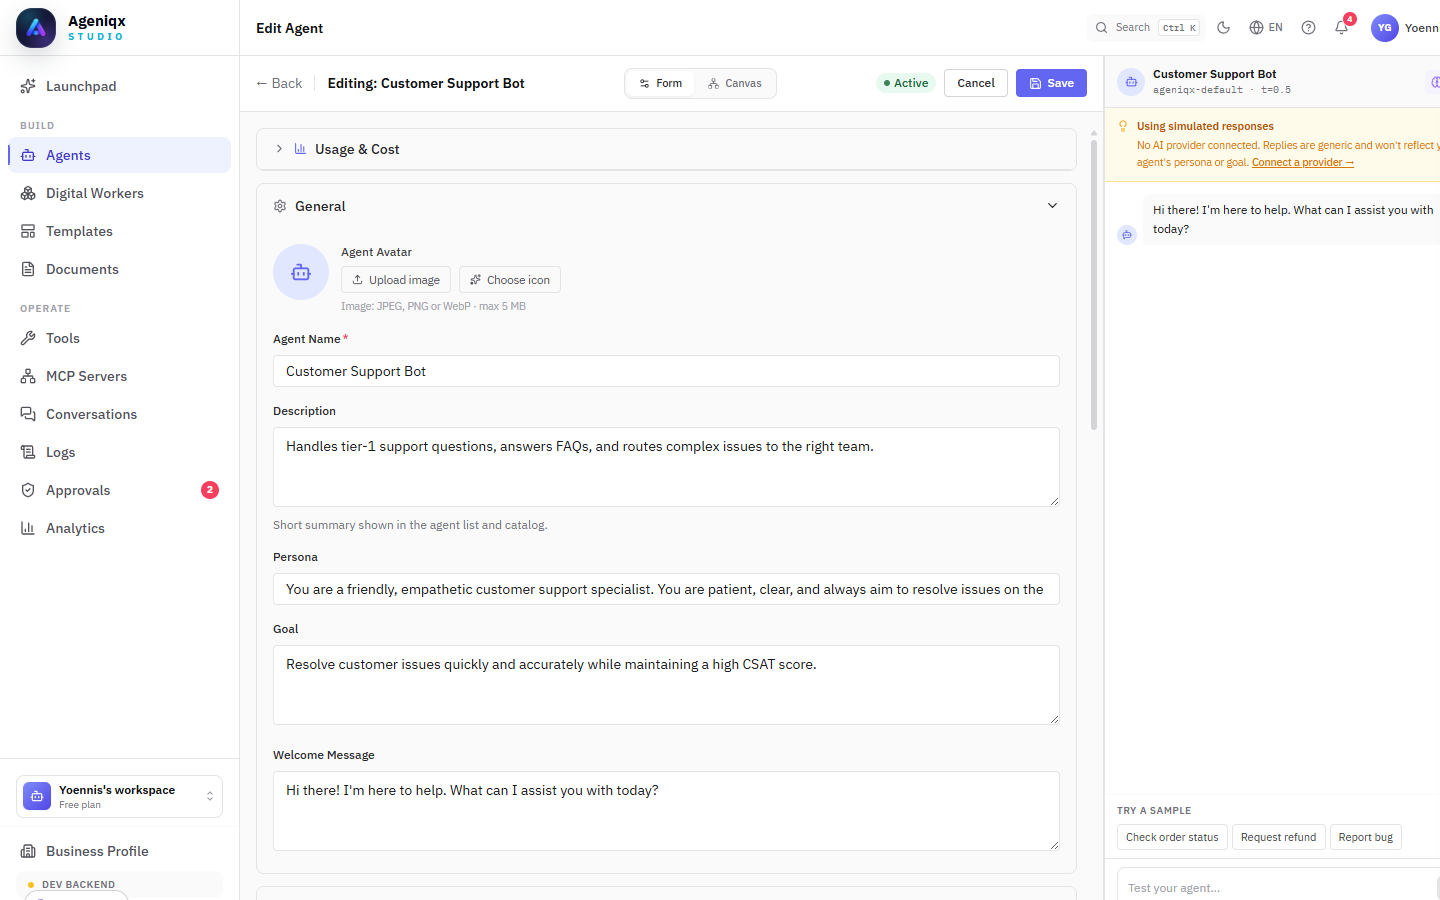
The agent builder — configure identity, instructions, AI model, and tools in one place.
Choose an AI model
Each agent uses one AI model. You can change this at any time. See the AI Providers section for a full comparison.
Assign tools
Tools let your agent take actions beyond just replying with text — like checking availability, sending a confirmation email, or updating a CRM record. You can add tools from the agent builder or create custom ones via the Tools section.
Test before publishing
Use the built-in chat preview (right sidebar of the agent builder) to test your agent before activating it on a channel. The preview shows the full message history and lets you iterate on your system prompt quickly.
Agent Canvas
Every agent has two editing modes accessible from the top of the agent builder: Form (structured fields) and Canvas (visual node graph). The Canvas is the agent-level view — it shows how the agent's internal components are wired together, and is distinct from the Workflow Builder canvas used for multi-agent Digital Workers.
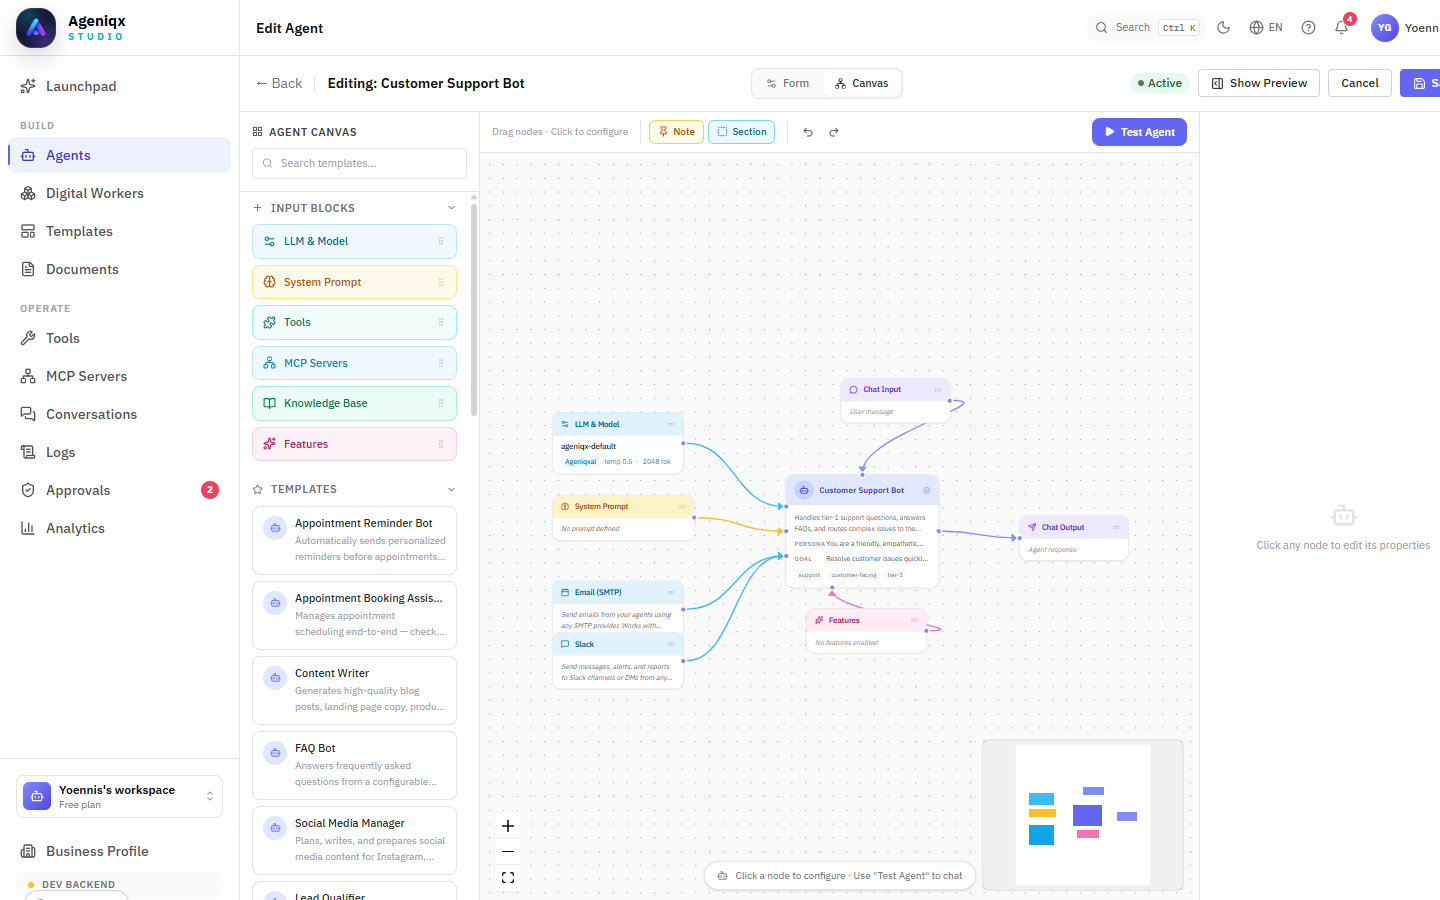
The Agent Canvas — visualise and wire together Input Blocks (LLM, System Prompt, Tools, MCP Servers, Knowledge Base, Features) for a single agent.
Left panel — Input Blocks & Templates
The left panel has two sections:
- Input Blocks — drag any block onto the canvas to add it to the agent: LLM & Model, System Prompt, Tools, MCP Servers, Knowledge Base, and Features.
- Templates — pre-built agent configurations you can drop onto the canvas as a starting point (e.g. Appointment Booking, FAQ Bot, Content Writer).
Canvas nodes
Each block on the canvas is a node. All nodes feed into the central agent node (shown with your agent's name), which then sends output to the Chat Output node. The flow is always: Input Blocks → Agent → Output.
Click any node to open its configuration in the right-hand panel. For example, clicking the LLM & Model node lets you change the AI model, temperature, and token limits without leaving the canvas.
Test Agent
The blue Test Agent button in the top-right opens a live chat panel directly on the canvas. Changes you make to nodes are applied immediately — you can tweak a system prompt and test the effect without saving and switching views.
Workflow Builder
Agentic Apps let you chain multiple steps into automated workflows using a visual drag-and-drop canvas. Each step is a node — a trigger, an AI agent action, a tool call, or a conditional branch.
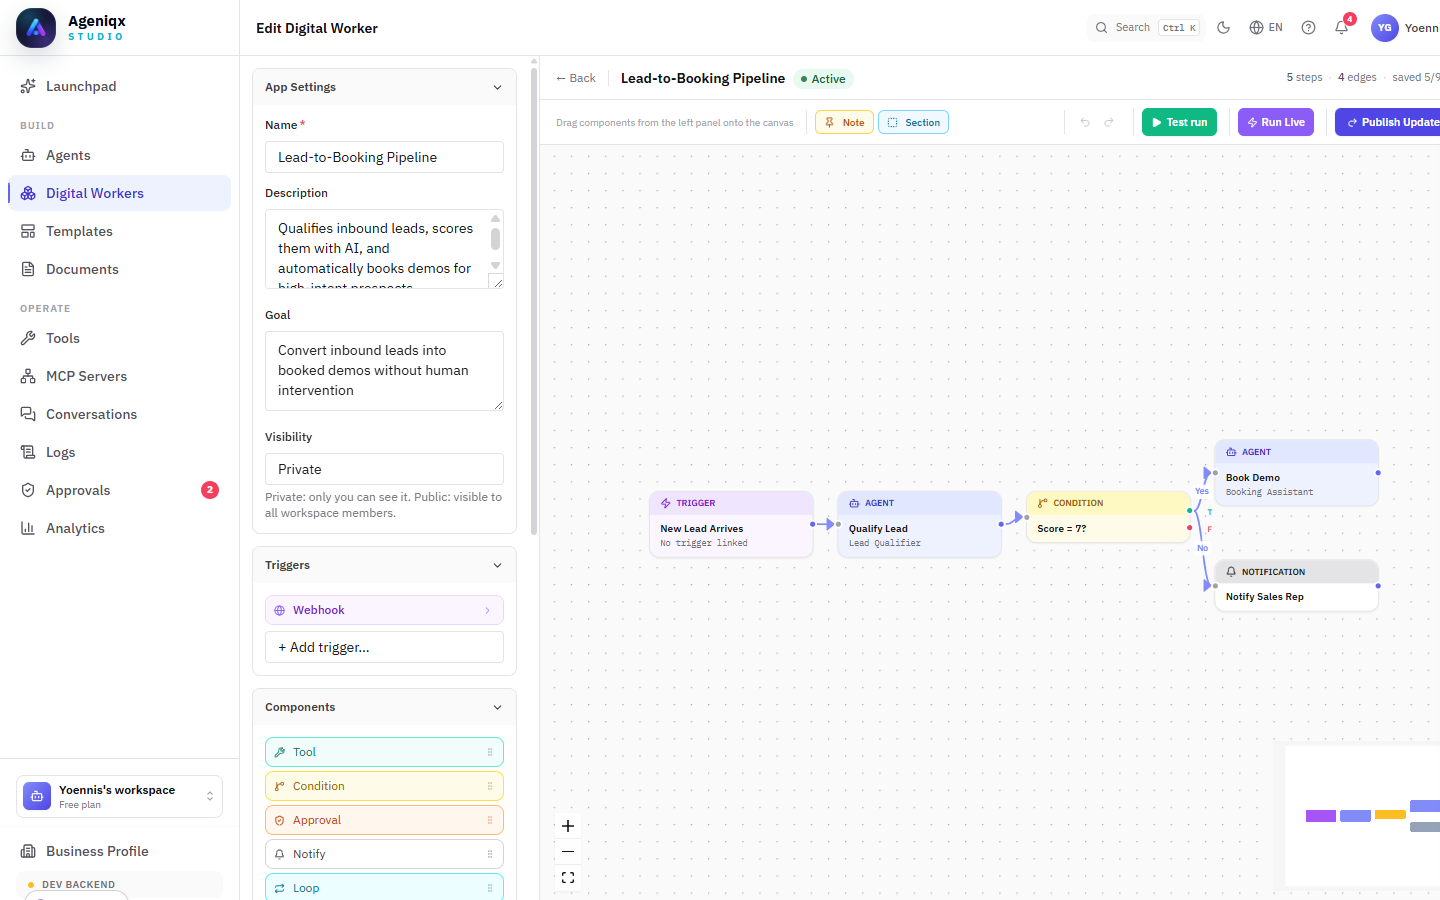
The workflow canvas — connect nodes to build multi-step automations visually.
Creating an Agentic App
From the sidebar navigate to Agentic Apps → New App. You'll land on an empty canvas with a default Trigger node. From there:
- Click + on any node to add a connected step.
- Drag nodes to rearrange the layout.
- Click any node to open its configuration panel on the right.
- Connect nodes by dragging from an output handle to an input handle.
Running a workflow
Workflows can be triggered manually (for testing), on a schedule, by an incoming webhook, or when a user message arrives on a connected channel. The trigger type is set in the first node.
Node Types
Every workflow is composed of nodes. Each node type has a distinct role:
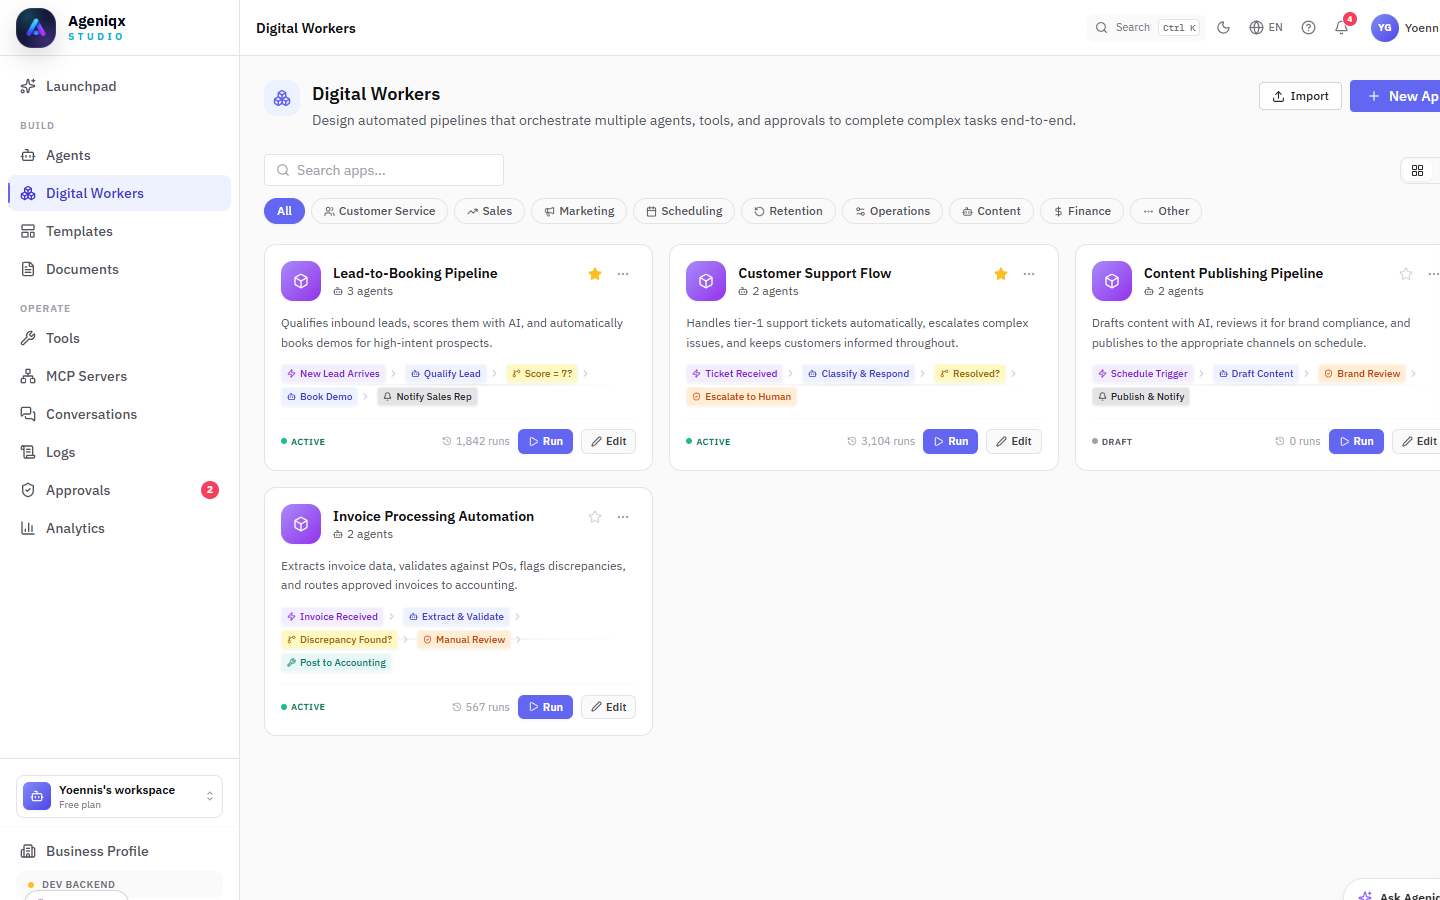
Digital Workers — pre-built and custom multi-step pipelines at a glance.
| Node type | Purpose | Example |
|---|---|---|
| Trigger | Starts the workflow. Every app has exactly one trigger. | New WhatsApp message, scheduled cron, incoming webhook |
| AI Agent | Runs an AI model with instructions. Can call tools mid-reasoning. | "Classify this support ticket" / "Draft a reply" |
| Send Email | Sends an email via a connected Gmail or SMTP account. | Confirmation email after a booking |
| Update CRM | Creates or updates a contact, deal, or note in a connected CRM. | Save new lead from WhatsApp chat |
| Condition | Branches the flow based on a boolean expression. | Route VIP customers differently |
| Delay | Pauses execution for a specified duration. | Wait 24 h then send a follow-up |
| Notification | Posts a message to a team channel (Slack, Teams, etc.). | Alert the sales team of a hot lead |
| HTTP Request | Calls any external API via GET, POST, PUT, or DELETE. | Fetch live inventory from your ERP |
| Document | Retrieves context from your uploaded knowledge base. | Pull the relevant FAQ answer |
Connecting nodes
Drag from the circular handle on the right edge of a node to the left edge of the next node. A connection carries the output data of the source node into the input of the target node. You can reference previous node outputs in any field using the {{node.fieldName}} syntax.
AI Providers
Ageniqx is model-agnostic. Each agent can use a different AI model, and you can switch models without changing anything else. To add a provider key go to Settings → Environment → AI Providers.
Environment settings — connect your own AI provider API keys.
| Provider | Model | Best for | Speed |
|---|---|---|---|
| AgeniqxAI | Built-in | All-purpose — no API key needed, included in all plans | Fast |
| OpenAI | GPT-4o | Complex reasoning, code, tool use | Fast |
| OpenAI | GPT-4o Mini | High-volume, cost-sensitive tasks | Very fast |
| OpenAI | o3 / o4-mini | Deep reasoning, planning | Slower |
| Anthropic | Claude 3.5 Sonnet | Long documents, nuanced instructions | Fast |
| Anthropic | Claude 3 Haiku | Fast, affordable customer-facing replies | Very fast |
| Gemini 2.0 Flash | Multimodal tasks, large context windows | Fast | |
| Gemini 1.5 Pro | 1M token context, long document analysis | Moderate |
Temperature & Max Tokens
Temperature (0–1) controls creativity vs. consistency. Use 0–0.3 for factual agents (support, FAQ), and 0.6–0.9 for creative tasks (copywriting, brainstorming). Max tokens caps the response length per message.
Channels
Channels are the surfaces through which your agents communicate with end users. Ageniqx supports four channel types — you can activate multiple channels on the same agent.
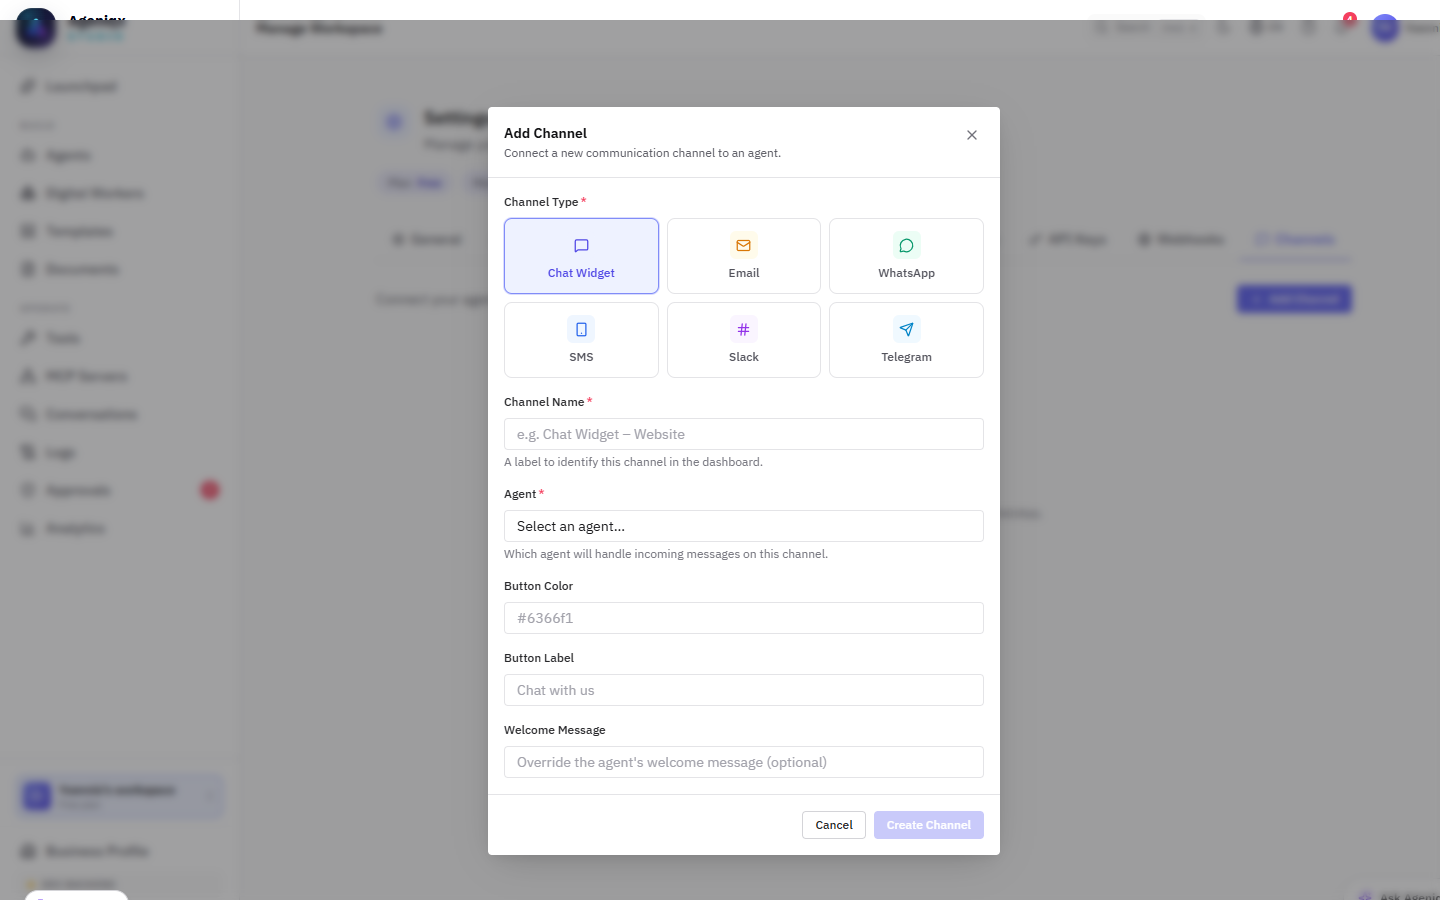
Channel setup — connect WhatsApp, Email, or embed a web chat widget.
| Channel | Setup required | Best for |
|---|---|---|
| Meta Business API account + phone number | Customer support, notifications, lead qualification | |
| Gmail OAuth or SMTP credentials | Inbound queries, automated follow-ups | |
| Web Chat | Paste a one-line script into your website | Live chat widget on any site |
| API | Ageniqx REST API key | Custom integrations, mobile apps, internal tools |
Connect via the Meta Cloud API. You'll need a verified Meta Business account and a dedicated phone number. In Settings → Channels → WhatsApp, paste your Phone Number ID, WhatsApp Business Account ID, and System User Token. Ageniqx handles all message routing and webhook verification automatically.
Web Chat Widget
The Ageniqx widget is a lightweight JavaScript snippet you paste once into your site's <head>. It renders a customisable chat button and panel. You can control the accent colour, position, greeting message, and which agent handles conversations.
Embed snippet
<script
  src="https://ageniqx.app/widget/ageniqx-widget.js"
  data-agent-id="YOUR_AGENT_ID"
  data-workspace-id="YOUR_WORKSPACE_ID"
  defer>
</script>
Tools & Integrations
Tools extend your agents with real-world capabilities. An agent with access to the right tools can browse the web, read and write emails, update a database, generate documents, and much more.
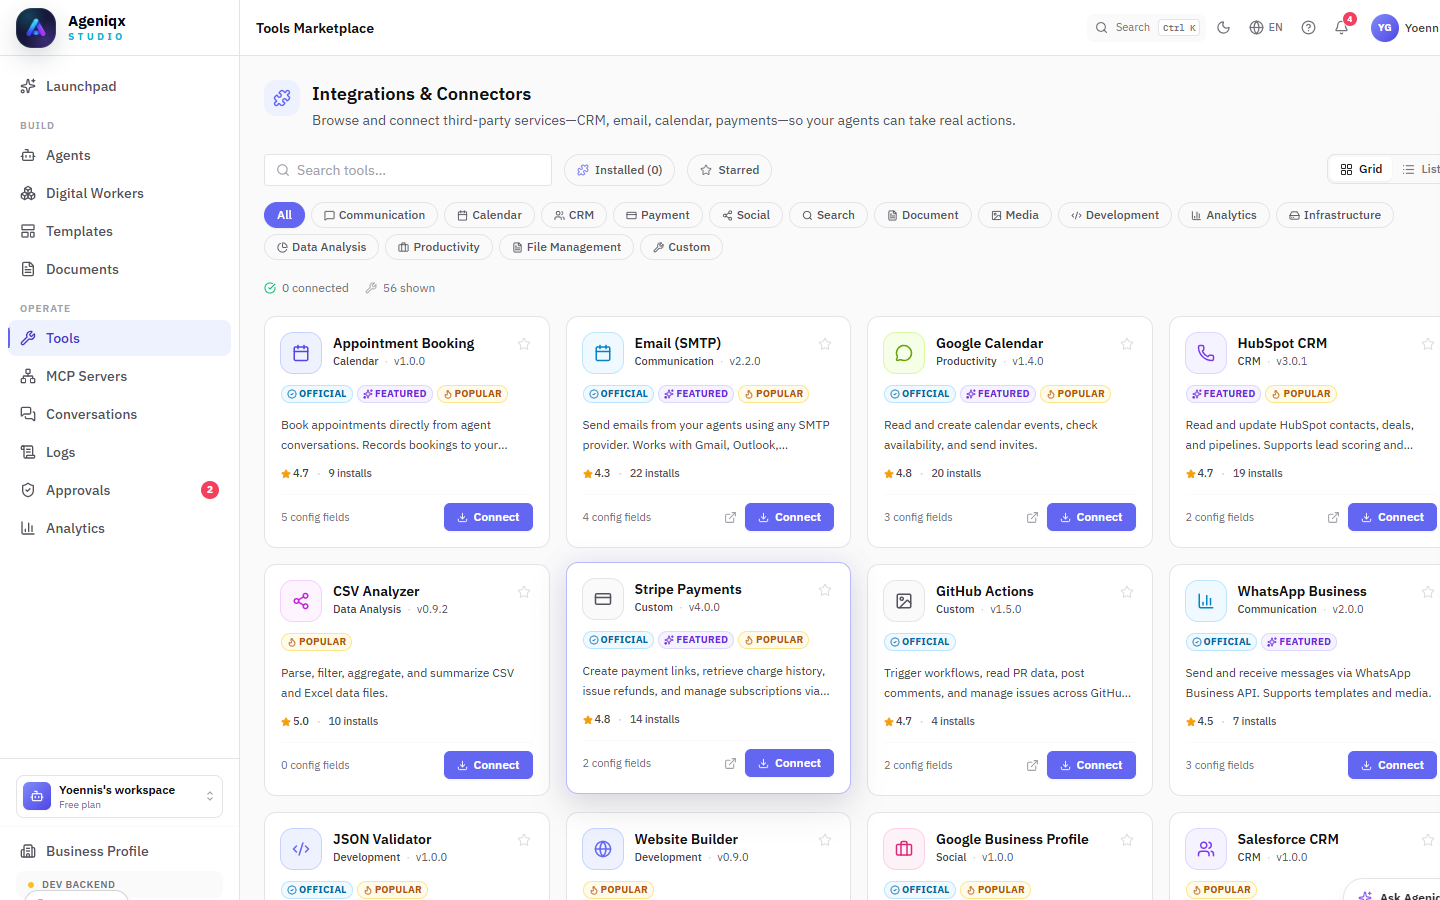
The tools library — browse, connect, and assign tools to your agents.
Built-in tools
| Tool | What it does |
|---|---|
| Send Email (Gmail) | Sends emails from a connected Gmail account. |
| Read Email | Reads unread messages from a connected inbox. |
| Web Search | Searches the web and returns summarised results. |
| Document Search | Performs semantic search over your uploaded knowledge base. |
| Calendar — Create Event | Books a calendar event in a connected Google Calendar. |
| Calendar — Check Availability | Queries free/busy slots within a date range. |
| Update CRM | Creates or updates contact/deal records in a connected CRM. |
| Generate PDF | Creates a formatted PDF from a template and field values. |
| HTTP Request | Makes arbitrary GET/POST/PUT/DELETE calls to any REST API. |
| WhatsApp — Send Message | Sends proactive WhatsApp messages to a contact. |
Connecting integrations
Most tools require authorising an external service. Go to Settings → Integrations and connect your Google account for Gmail and Calendar tools, or paste API keys for CRM and other services. Once connected, the tools become available to assign to any agent in the workspace.
MCP Servers
Ageniqx also supports the Model Context Protocol (MCP) — a growing ecosystem of community-built tool servers covering databases, APIs, email, calendars, and more. See the MCP Servers section below for a full walkthrough.
Templates & Library
The Templates Hub (sidebar → Templates) is a curated catalog of ready-made resources you can install into your workspace in one click. It contains three tabs:
| Tab | What's inside |
|---|---|
| Agent Templates | 30+ pre-built agents organised by use case (Customer Service, Sales, Marketing, Scheduling, Retention, Operations, Content, Finance). Each card shows setup time, ratings, required tools, and an Install in one click shortcut. |
| Prompt Library | Curated system prompts, personas, instructions, chain-of-thought patterns, and output-format blocks. Prompts use template variables like {{agent_name}} and {{company_name}} that are filled automatically on install. |
| Digital Workers | Pre-built multi-step workflow templates for common automations (Lead-to-Booking, Support Escalation, etc.). Install as a starting point and wire up to your own agents. |
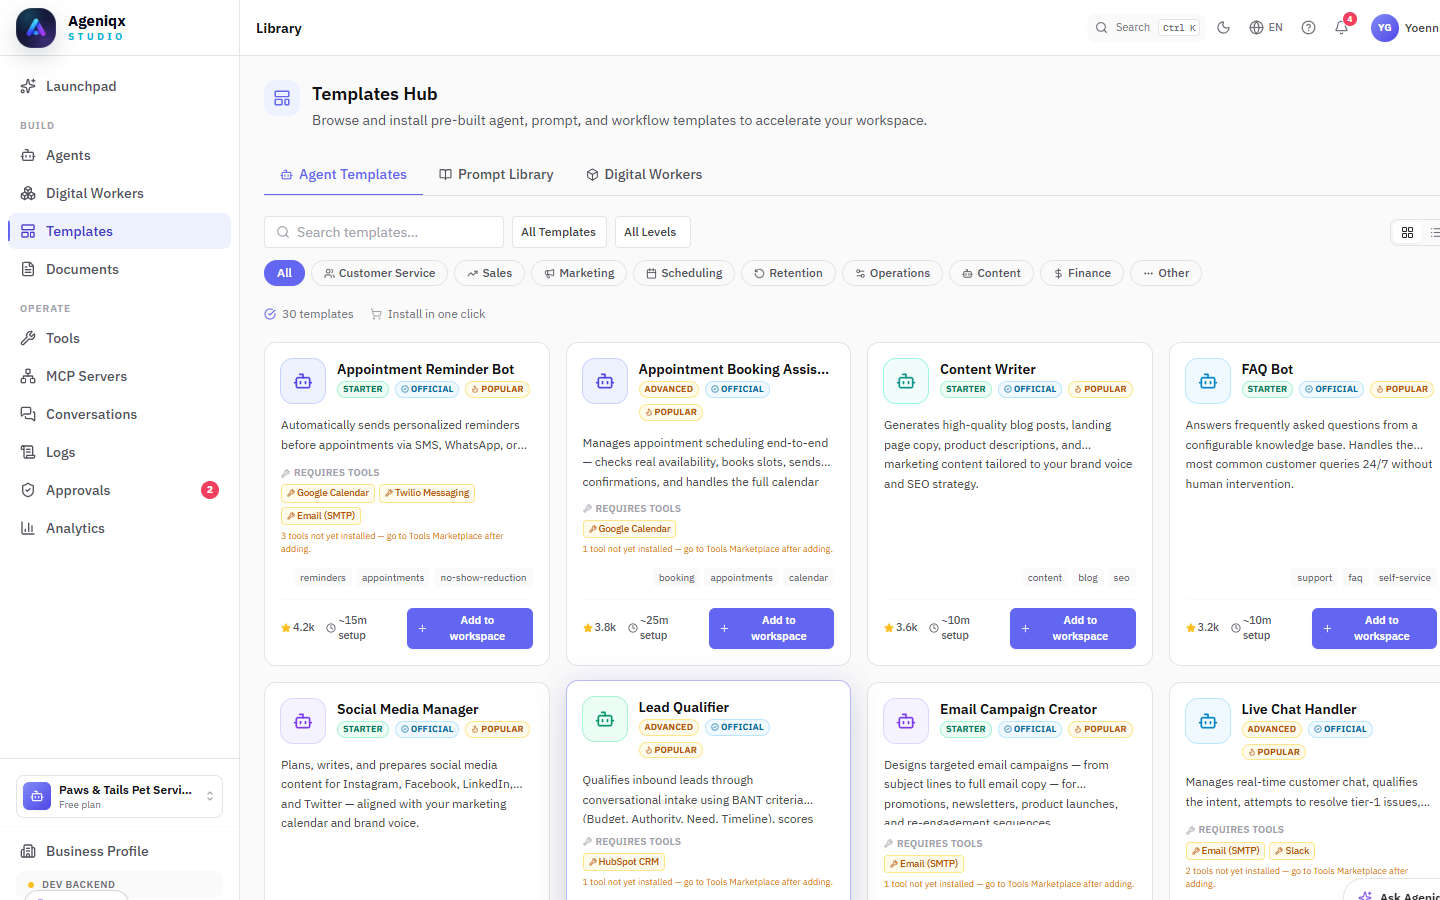
Agent Templates tab — 30+ templates filterable by category. Each card shows ratings, estimated setup time, and required tools.
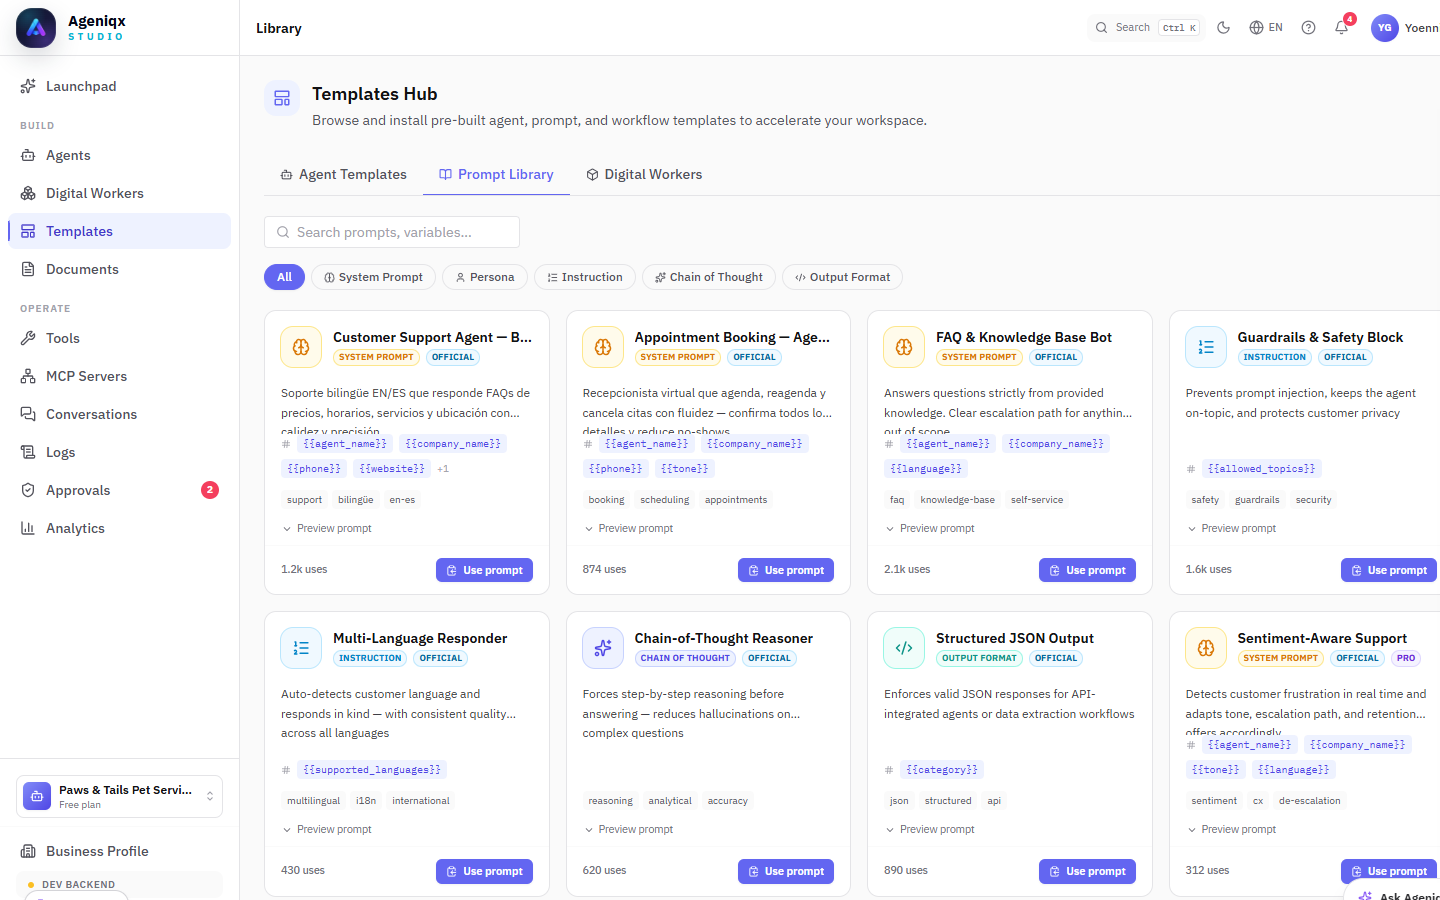
Prompt Library — ready-to-use prompts with variables. Click Use prompt to insert it into your agent's system prompt field.
Exporting & importing agents
Any agent you've built can be exported as a JSON file and re-imported into the same or a different workspace. This is useful for backups, sharing agents with teammates, or moving a tested agent from a staging workspace to production.
- Export: Open an agent → click the ⋯ menu → Export agent. A
.jsonfile is downloaded to your computer. - Import: From the Agents list → New Agent → Import from file. Select the exported JSON and all settings, tools, and instructions are restored.
Documents
The Document Library (sidebar → Documents) is your workspace's knowledge base. Upload files and connect external sources so your agents can reference them when answering questions — giving responses grounded in your actual business content.
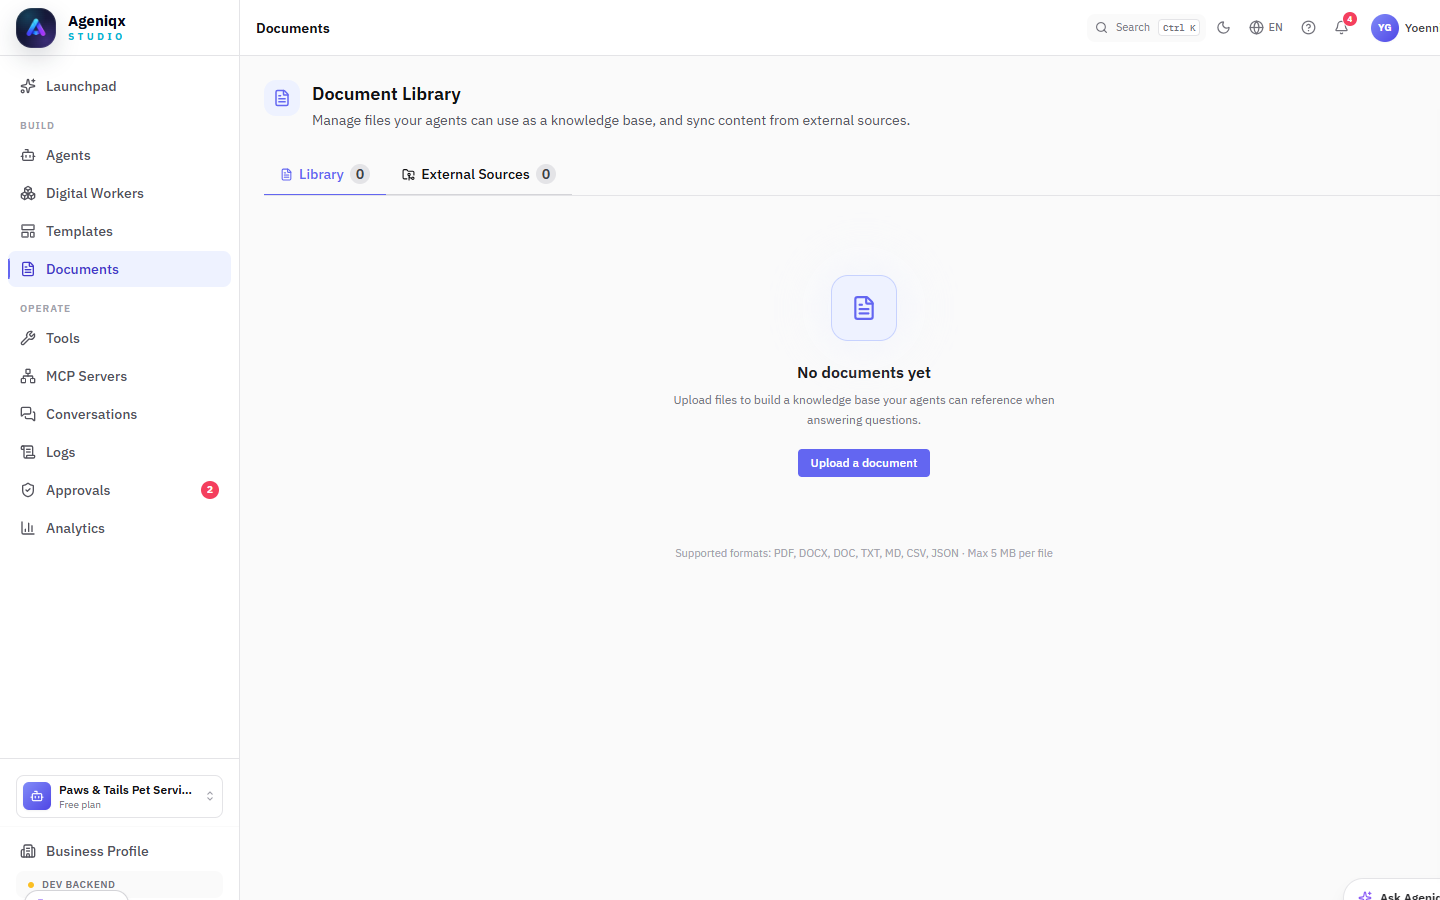
Document Library — upload files or connect external sources. Supported formats appear at the bottom of the empty state.
Uploading files
Click Upload a document and select one or more files. Supported formats:
- PDF, DOCX, DOC — product manuals, service brochures, contracts
- TXT, MD — plain-text FAQs, release notes, knowledge articles
- CSV, JSON — structured data like product catalogues or pricing tables
Maximum file size is 5 MB per file. Once uploaded, the document is indexed and becomes available as a Knowledge Base block in the Agent Builder.
External Sources (GitHub sync)
Connect a GitHub repository and Ageniqx will automatically sync its documents into your library. Use this to keep your agent's knowledge up to date with your product docs or internal wiki without manual re-uploads.
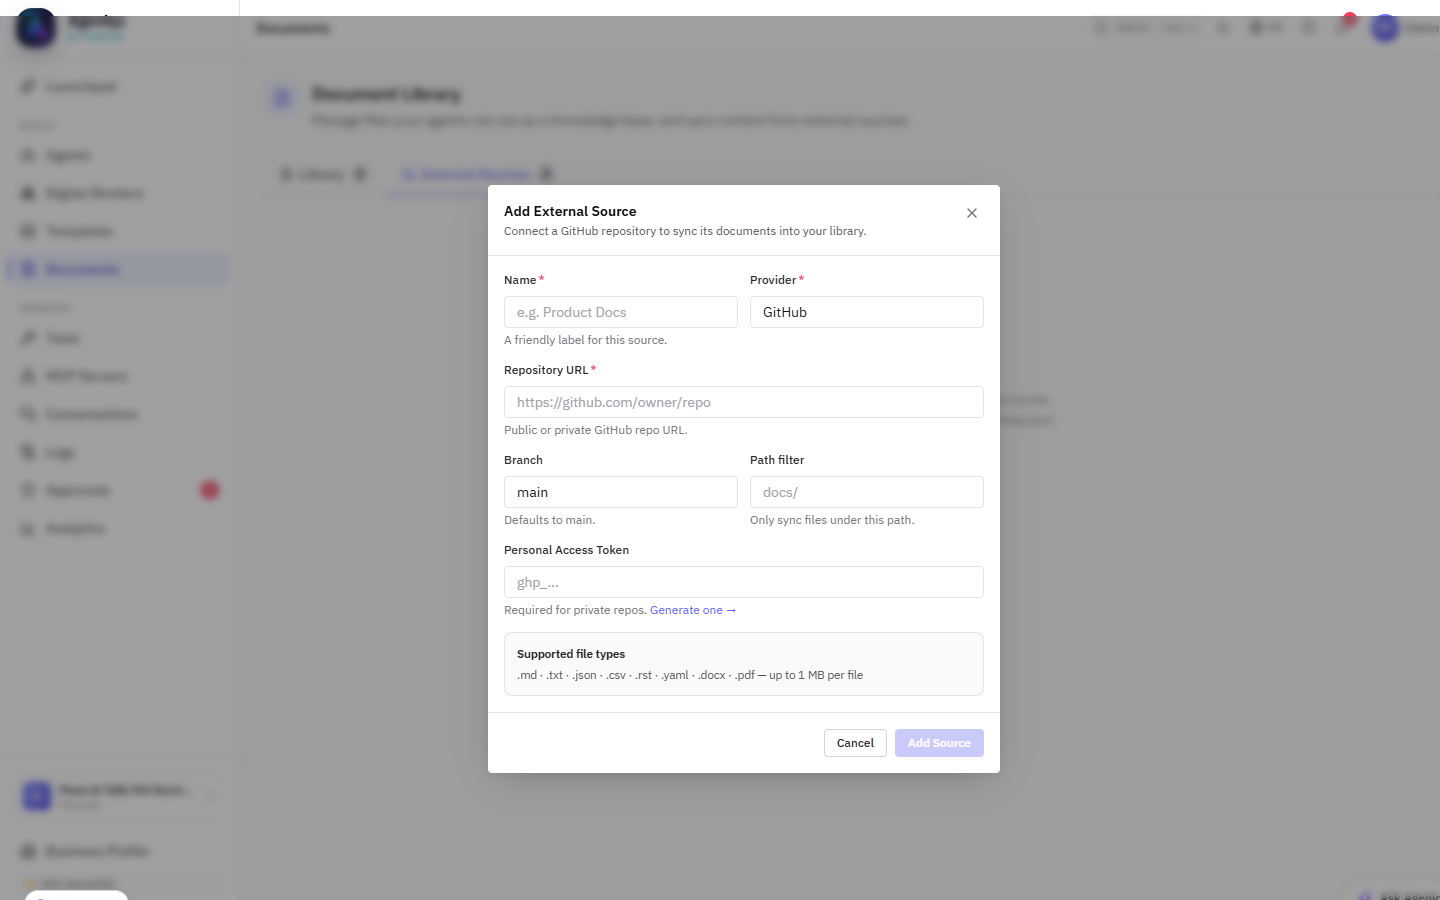
Add External Source — connect a public or private GitHub repo. Set a branch and path filter to sync only the relevant docs folder.
- Provider: GitHub (SharePoint and Box coming soon)
- Branch: defaults to
main - Path filter: e.g.
docs/to sync only documents under that folder - Personal Access Token: required for private repositories
Using documents in agents
In the Agent Builder (Canvas view), add a Knowledge Base input block and select the documents or external sources you want the agent to reference. The agent will perform a semantic search over those documents before composing its reply.
Conversations & Execution Logs
Every interaction with your agent is captured as a Conversation. The Conversations view gives you a real-time log of all messages across all channels.
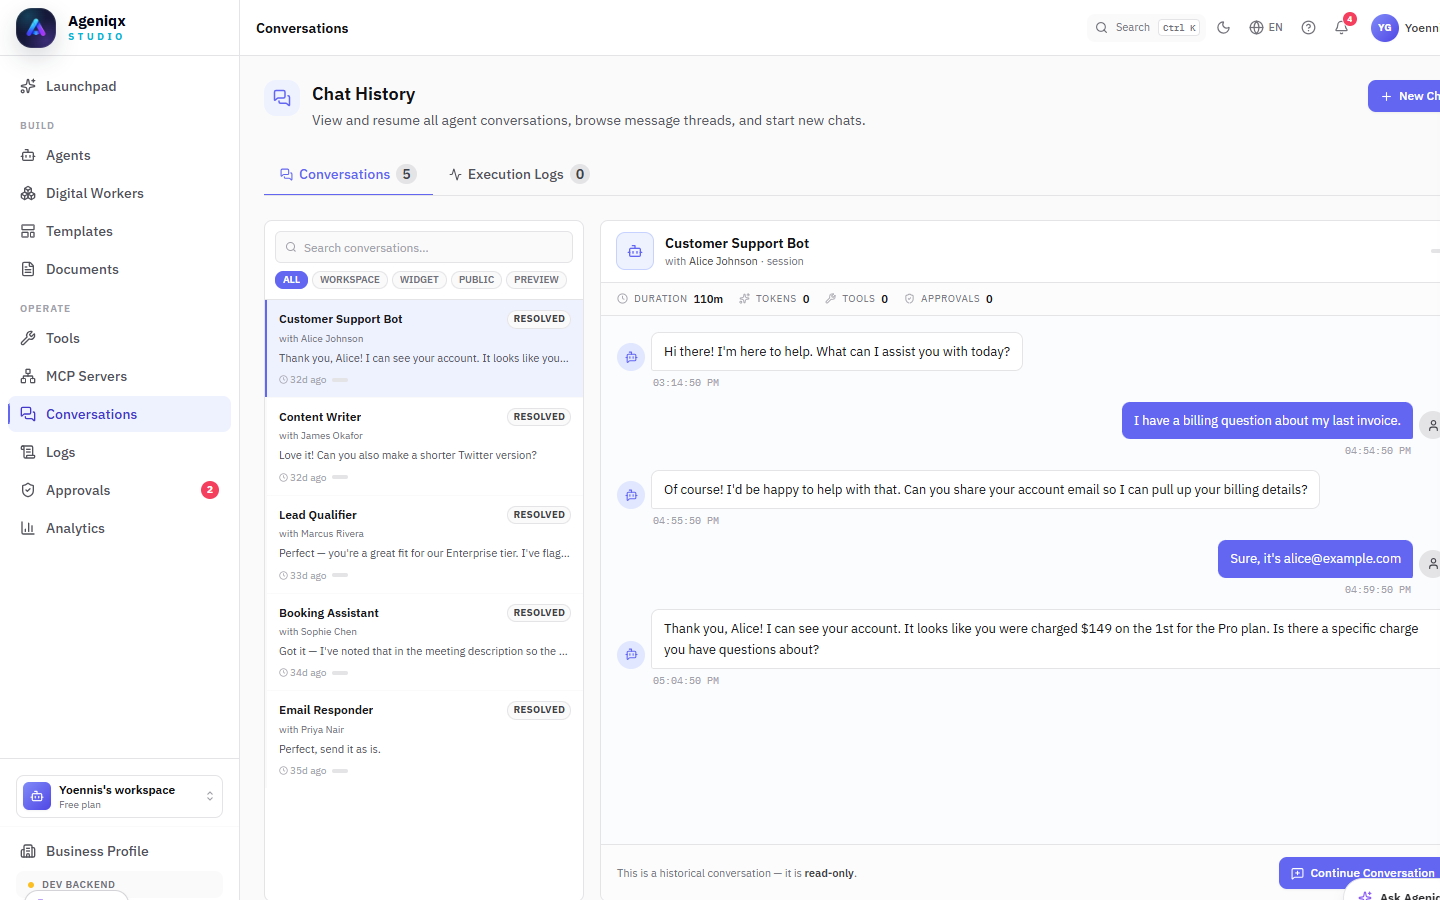
The Conversations view — inspect every message, agent response, and tool call in detail.
What's captured
- Every user message and agent reply, with timestamps.
- Tool calls made by the agent during the conversation (e.g. "Searched web for X", "Sent email to Y").
- The AI model used and token consumption per message.
- Latency — how long the model took to respond.
- Any errors or fallbacks that occurred.
Execution Logs
For Agentic Apps (multi-step workflows), each run produces an Execution Log. You can inspect every node's input, output, duration, and status. This is invaluable for debugging a workflow that's not behaving as expected.
Analytics
The Analytics dashboard gives you an overview of your agent and workspace activity over time. Use it to understand usage patterns, monitor costs, and spot opportunities to improve.

Analytics — track executions, costs, response times, and activity by agent.
Key metrics
| Metric | Description |
|---|---|
| Executions | Total number of agent runs or workflow executions in the period. |
| Token usage | Input and output tokens consumed — useful for cost estimation. |
| Avg. latency | Mean time from user message to agent reply. |
| Active conversations | Conversations with at least one message in the period. |
| Error rate | Percentage of executions that resulted in an error. |
| Top agents | Ranked by execution count — shows which agents are most active. |
Ask Ageniqx
Ask Ageniqx is your built-in AI copilot — always available in the bottom-right corner of the app. It understands the full context of your workspace and can help you build, configure, and troubleshoot without leaving the page you're on.
Ask Ageniqx — your workspace-aware AI copilot available from any page.
What you can ask
Ask Ageniqx is context-aware and workspace-scoped. Some examples:
Example prompts
"Create a customer support agent for a beauty salon"
"Add a WhatsApp channel to my Email Responder agent"
"Why did my Lead Qualifier agent fail the last execution?"
"Update my business hours to close at 6pm on Saturdays"
"How do I connect a Google Calendar tool?"
"Show me which agents had errors in the last 24 hours"
Capabilities
| Capability | What it can do |
|---|---|
| Create agents | Scaffolds a new agent with name, instructions, and suggested tools based on your description. |
| Update Business Profile | Fills in or improves your business context fields from a natural-language description. |
| Troubleshoot | Analyses recent execution logs and explains what went wrong and how to fix it. |
| Answer questions | Explains any Ageniqx feature, walks you through setup steps, or clarifies concepts. |
| Suggest improvements | Reviews your agent's system prompt and suggests clearer, more effective instructions. |
MCP Servers Advanced
Model Context Protocol (MCP) is an open standard that lets AI agents call external tools at runtime — databases, APIs, email, calendars, and more. Ageniqx ships with a built-in MCP catalog and lets you add custom servers, making it easy to extend your agents well beyond the built-in tool set.
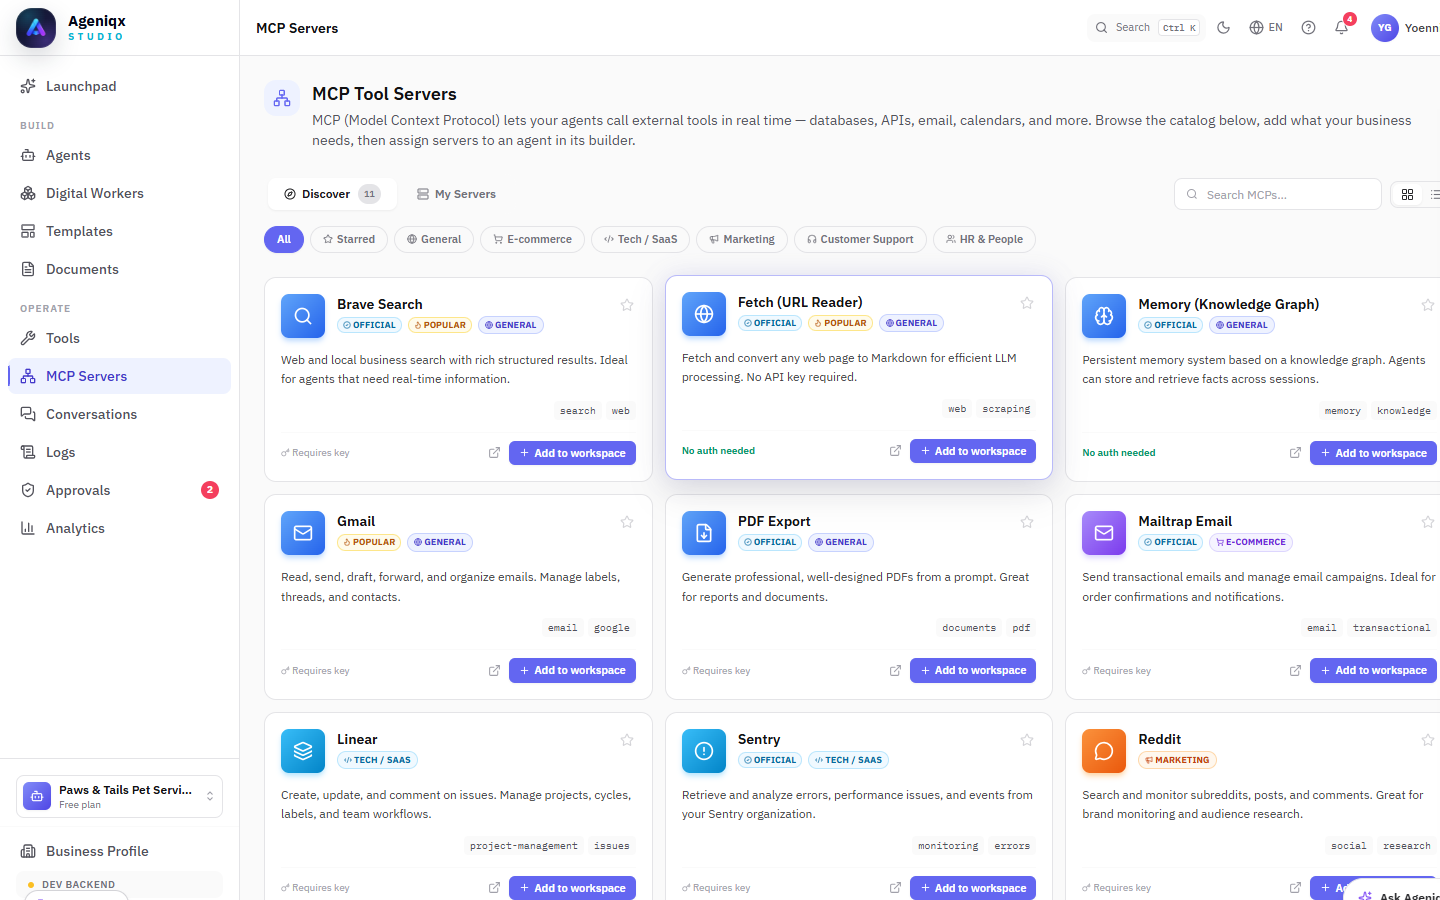
MCP Tool Servers catalog — browse and install servers by category. Cards show whether a key is required or if the server is ready with no authentication.
Discover & install servers
Go to MCP Servers in the sidebar. The Discover tab lists all available servers with category filters:
| Category | Example servers |
|---|---|
| General | Brave Search, Fetch (URL Reader), Memory / Knowledge Graph |
| E-commerce | Mailtrap Email, PDF Export |
| Tech / SaaS | Linear, Sentry |
| Marketing | Reddit, Social analytics tools |
| Customer Support | Gmail, Live Chat integrations |
Click + Add to workspace on any card to install it. Servers marked No auth needed are immediately ready. Servers marked Requires key will prompt for an API key once installed.
Using MCP servers in agents
After installing a server, open an agent in the Canvas view and add an MCP input block. Select the installed server from the dropdown — the agent will be able to call its tools during conversations.
Custom servers
You can also connect any MCP-compatible server by providing its URL and configuration in My Servers → Add custom server. This is useful for internal tools or self-hosted services that expose an MCP endpoint.
API & Webhooks
Every Ageniqx capability is accessible via the REST API. Use the API to trigger agent conversations programmatically, send messages from your own application, or build custom integrations.
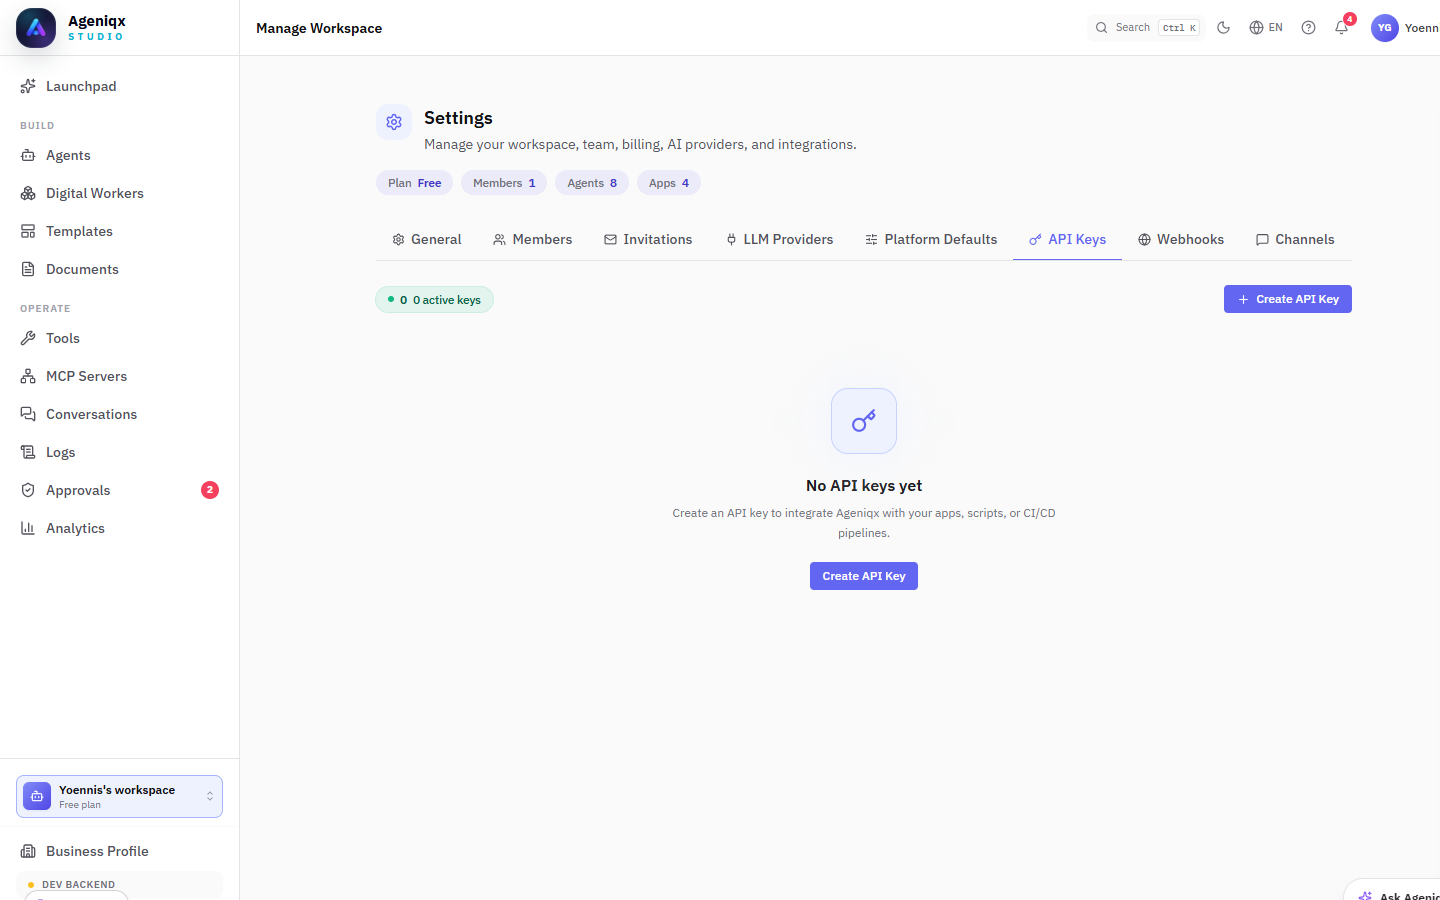
API Keys — generate and manage keys with scoped permissions.
Authentication
All API calls require a Bearer token. Generate API keys in Settings → API Keys. Each key can be scoped to specific permissions (read, write, execute) and restricted to allowed origins.
Send a message to an agent
POST https://api.ageniqx.com/v1/conversations
Authorization: Bearer YOUR_API_KEY
Content-Type: application/json

{
  "agentId": "agt_xxxxxxxxxxxx",
  "message": "Hi, I'd like to book a massage for Saturday",
  "channelType": "api",
  "userId": "user_123"
}
Webhooks
Configure inbound webhooks to trigger Agentic Apps from external systems. Each Agentic App can expose a webhook URL — any HTTP POST to that URL starts a new execution with the request body as the input data.
X-Ageniqx-Signature header in your receiving server to ensure the request is genuine.
Plans & Billing
Ageniqx offers flexible plans for teams of every size. All plans include the core platform features — the difference is in execution limits, team seats, and premium support.
| Plan | Best for | Executions / mo | Team seats |
|---|---|---|---|
| Starter | Solo builders, small experiments | 1,500 | 1 |
| Pro | Growing businesses, high-volume automations | 50,000 | 15 |
| Enterprise | Custom needs, SLA, dedicated support | Unlimited | Unlimited |
All plans are billed monthly. You can upgrade, downgrade, or cancel at any time from Settings → Billing. For Enterprise pricing, contact sales@ageniqx.app.